Web Toolbar by Wibiya Free Time Frolics: Halloween
Showing posts with label Halloween. Show all posts

Friday, October 12, 2012

Please Welcome {Simple Simon}

 I met these 2 awesome ladies over Labor Day Weekend at Swiss Days in Midway, Utah.  Swiss Days is the Ultimate, Outdoor Craft Boutique.  Art, Handmade Goods, Food and Entertainment.  If you happen to be in Utah over Labor day. Stop and shop a while.  These Lovely ladies had a booth.  I do have to say I was a little celebrity shocked.  I recognized there logo on there items and loved them. I have been a fan of Simple Simon for a while. So I asked them if they would guest post.  They said yes!!  {Squeal}  So here they are...
Hi!  I am Elizabeth from Simple Simon & Co, one-half of the duo of sisters-in-law who love to sew, thrift, and make simple projects!  And today's project especially fits the simple category.

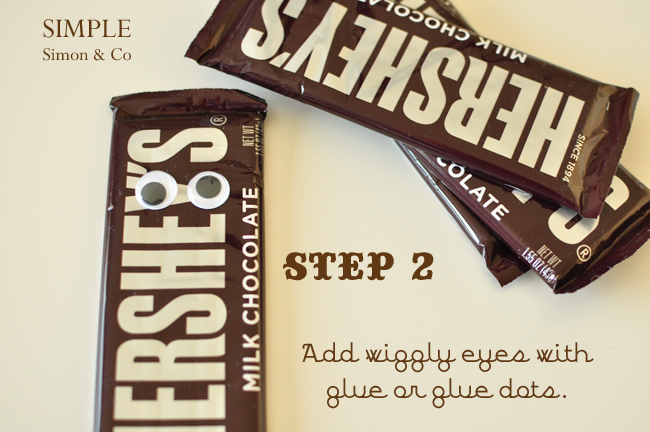
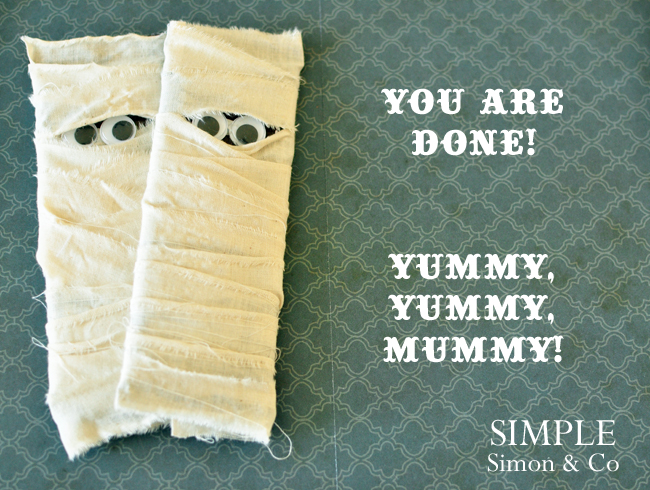
I have made these in many-a-classroom Halloween party, with all ages of kids and they have always been a success!  {It's the candy bar effect....candy bars are always a success.}


Here's what you will need if you want to make them with your kids too:


Thanks Adrienne for inviting us!!!! {And it was so nice to meet you earlier last month.....what a fun chat!}

So fun Elizabeth! Thank you for visiting with us.  If you haven't been to there blog head over and take a look.  They have tons of fantastic tutorials. They also run Project Run & Play.  A fun competition on line for children's clothing.  They also do Skirting the issue.  Please head over and check out what Simple Simon is all about.

Simple Simon & Co
Simple Simon and Co

This post was sponsored by:

Thursday, October 11, 2012

Halloween Printable's

A few Free Printable's just for you.  Please follow the Free Printable Guidelines below.


Free Subway Art for your Halloween Mantel.


Click on the link or Right Click the image and save to your computer. Print wherever you like.

PLEASE follow the following rules for Free Time Frolics printable's:
  • I would love for you to become a follower of Free Time Frolics via Rss and Facebook. More Free Printable's are coming. You don't want to miss out.
  • Free Time Frolics printable's are for PERSONAL USE only. You may not re-sell, re-distribute, or claim them as your own.
  • If posting on the internet, you MUST post a link back to the original post or the Printable's  page.
  •  Freebie printable's are offered "as is" unless otherwise noted. 
  • Pin, share, use in your home or as a gift.  Enjoy!


Monday, October 8, 2012

Halloween Costume - Spider

Here is my little Spider.  no one really loves spiders but I love this one. I think this is one of my favorite costumes I have ever made.  And it was super simple to make.
I first purchased black sweats, gloves and beanie. With a Bean bag pattern.  I altered it to leave the bottom and top open. I made 6 long fabric tubes and sewed gloves to the end of each of them.To   Stuff them with stuffing.  Starting with the main body, a bean bag usually has 6 sections. I sewed 3 sections together and the second 3 sections together. Pin your arms into place leaving a 6 inch hole near the top of the sections for your kiddos arms. Stitch your 2 sections together.   On the top and bottom you need to make a casing.  Add your elastic.  I liked mine a little tight to make sure the pillows I added would not fall out.  To link the arms I wrapped black ribbon around each wrist and tied a knot.  Then made a loop for my son to have around his wrist.
When you are ready to trick or treat Just slip it over your kiddos head like a shirt and add pillows to fluff him up. I added a little makeup for the full effect. 

An there is your Black Furry Spider! For more Costume Ideas click the Costume Link or see my Masquerade Magic Pintrest Board!

SixSistersStuff.com

Friday, October 5, 2012

Itsy Bitsy Spider Door Decor


This year for Halloween I wanted a little something different for my front door.  There are some many cute wreaths out there.  I love them all.  I was wanting something a little more non traditional. I found my idea at the Dollar store.

 Here is what you need:
2 googly eyes
spool 3/8 inch black ribbon
Foam pumpkin
Spider web
Hot Glue
Dowel or skewer

Start by wrapping your ribbon on to a skewer or dowel like in this post: Here {Spider Hair Clips}
 After baking your ribbon cut into 8 equal parts.

Take a skewer and punch a hole into the pumpkin.  Use the skewer to push the ribbon inside.  Use a bit of hot glue to secure the ribbon into place.


Add your googly eyes. 
Depending on how long you want your spider to hang, cut your ribbon accordingly.
Use the skewer to punch the ribbon through.  Dab some glue to the hole and ribbon to secure. 

 Your spider is ready to hang.

Add your Spider web and your new spider has a home!

I added mine to my front door.  Not quite your traditional door decor.  But sometimes I am not so traditional!


Don't forget the Masquerade Ball is up and going.  Stop by and link up your favorite Handmade Halloween Costumes. Some serious prizes are up for grabs.  Will one go to you???
Free Time Frolics
Visit thecsiproject.com

Thursday, October 4, 2012

Please Welcome {52 Mantels}

Today I have a fun painting technique to show you as well as an easy Painted Halloween Sign! I'm so glad that Adrienne invited me over to participate in the Masquerade Ball. I love the fun costumes of Halloween and I can't WAIT to get inspired by you all! 


Painted Halloween Sign {using a charcoal transfer method!}

supplies:
unfinished wooden plaque
mod podge
paint brush
charcoal pencil
decorative paper (I used a chevron treat bag because I liked the pattern!)
an image to trace (I used this bat and added words. But, you could use any image you can print on plain printer paper!)
paint (I used black acrylic)


After gathering supplies, cut your paper to fit the plaque's face. Attach the decorative paper to the wood by painting mod podge under and on top of the paper. After the mod podge dries, take a cloth or paper towel and "paint" the plaque's sides with black paint. You could do this with a brush, if you'd rather. I wanted a rough, distressed look, so I dry-rubbed the paint on the sides with my paper towel, letting some come over onto the paper.  


To transfer your image onto your dry plaque, rub charcoal over the entire backside of your image. Place the image, charcoal side down, onto your plaque. Take a pen, pencil or sharp object and trace around the entire image. For the letters, trace around the edges. When you lift the paper, the design will be outlined in charcoal. So cool! 


After your design is traced onto your plaque, take a small paintbrush and paint inside the lines. After my plaque was done, I painted on small, flying bats to add a bit more.

Wah-la! You have a hand-painted Halloween Sign! Now that you know this technique, you can use it for all KINDS of things! Get creative! 


You can find Emily at 52 Mantels a blog about all things home, including weekly mantel makeoversseasonal craftseasy recipes and simple DIY projects. Come over for a visit! 

                                         52 Mantels
52 Mantels
52 Mantels
52 Mantels
52 Mantels

A Big Thanks to Emily for Posting today.  What a fun project to do.  I may even have my older boys try that out!  Please head over to 52 Mantels and check it out.  So many great ideas!!! The Masquerade Ball Link Party is up and running. Se sure to add your Handmade Costumes!

This post was sponsored by:
Related Posts Plugin for WordPress, Blogger...