Web Toolbar by Wibiya Free Time Frolics: gifts
Showing posts with label gifts. Show all posts

Tuesday, July 24, 2012

Super Saturday Project Ideas

A few weeks ago I was contacted by Poppy Seed Projects.  The put together projects for you to do yourself or as a group.  They even offer group discounts. They have all kinds of ideas for decorating you home.  Picture frames, vinyl or holiday decor.  You will the love the selection. I could not decide what I wanted.  So I went a little over board.  Expect to see more poppy seed projects!   I was asked to do a little round up of Super Saturday Projects.  These are projects you can do with large groups of ladies on a Saturday afternoon. So set up a girls day and get crafting! So here you go!!!

1. I Love to see The Temple
I had this one in mind for my daughter.  It would make a great gift for that special Little Miss in your life. I was going to wait for Christmas to give my Little Miss hers but she saw it and fell in love.  Her favorite song to sing is I Love to See the Temple.  We sing it every night.


I made this into a gift bundle just for her.  Here is what I used.
Temple Memory game
Temple Block
I Love to see the Temple Printable (Here)
I packaged it as a fun little bundle.  Wrapped in a cellophane bag with shredded tissue paper and tied with a big bow.
 A fun gift for under $15

2. Ctr Block and Printable

This is option #1-
A great idea for a young man preparing for a mission or boy receiving the Priesthood.
 CTR Block
Printable of 1 Nephi 3:7
Add a new Tie.  
This little gift set adds up to less Than $10 plus our neck tie.  Wrap your gift using the necktie as part of the wrapping.
Option #2-
I love this idea and wish I had done this for my sons baptism.  I think this would have been great for a centerpiece or table decor for his family get together. Add your favorite Picture and you have something they can have for a life time.  Add a gift card for a CTR Ring or necklace.Do this for Girls or Boys.

For this little bundle I used:
CTR Block
Baptism Printable (Here)
Baptism Subway Art copy
Missionary Printable (Here)
Easy gift for under$10

3. Button Bracelet
Here is an easy and fun tutorial to make a beautiful bracelet from buttons.  Mom, Grandmothers, daughters or even your Visiting teaching ladies would love one of these.
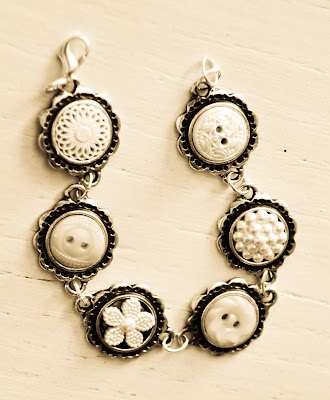
Here is a quick supply list:
Buttons - Vintage or new
Some cute charms that have holes on two ends
jewelry glue or E-6000
jump rings or some kind of connector links
a lobster clasp
and pliers and crimpers

4. Quiet books
I just love photo quiet books.  They are simple to put together and my kiddos love them.  Here are a few to choose from.
Gospel ABC Cards
We Beleive
Book of Mormon (This one requires a little bit of work.  But is extremely cool.)


After printing them at a photo lab you can expect to spend around $6 or $7 each. Just add them to a photo book from the dollar section and you are ready to go.Usually Photo labs like Walmart or Costco will give you a discount if you order lots many prints.  Costco requires you to order more than 500 prints for a discount.  This will decrease the amount each book costs.

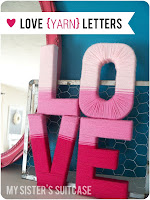
5. Monogram Letters:
I am super excited about this one.  I have been wanting a Monogram letter for my gallery wall.  Buy the First letter of your last name.  All you need is a Letter from Poppy Seed Projects and any of the following:
Modge Podge with scrapbook paper
Wrap with yarn,
or use vinyl and paint To create a unique Letter. 
Anyway you do it, make it your own.  Fun and Unique just like your family!Her are a few examples. Click onthe image for the instructions.
http://farm3.static.flickr.com/2718/4406572769_91eff47e73.jpg
I hope this little round up has sparked your creativity!!! Christmas is just around that corner.  Its never to early to get started.


Thank you Holly and Poppy Seed Projects for Sponsoring this post!

Thursday, July 19, 2012

Onesie Bow Tie

Did you see my Onesie Neck Tie Post??? How about a bow tie?  I thought this would be a cute addition to your little guy's wardrobe.   This tutorial is easy and simple. You can probably make one in 30 minutes or so.  

Sunday, July 8, 2012

Onesie Neckties {Big Boy Style}

I found this great tutorial for Onesie ties over at Brassy Apple.  I love the simplicity of the little Onesies.  I started thinking, maybe I could give this a little more of a big boy look.  So I started playing around and came up with this.


Wednesday, May 16, 2012

Covered Corkboards


Next week is Free Time Frolics Birthday.  Make sure come back and check out some great guest blogger and a fantastic giveaway!

On to this week.
Teacher Appreciation was last week and I am a little behind.  I have had this one in my cue for a while needing 1 picture.  I finally got it done.  So here is a quick easy teacher gift you can do with afew supplies from you home and a couple of dollar store items.


Supplies
Piece of Cork
Frame
Spray paint (optional)
Spray Adhesive
Tacks
Buttons to Cover
Fat quarter or enough fabric to cover your cork
E6000 Glue
Glue Gun w/ Glue
Frame backing or foam core
2 or 3 fabric scraps (2x2 squares) for tacks

Start by spray painting your frame is you are changing its color.  This can be drying while you make the inside.

Start by Cutting your cork to the inside size of your frame.  Take fabric and cut it 1 inch larger around cork.  Iron your fabric nice and flat to get out wrinkles.
Spray adhesive onto wrong side of fabric.  Layer cork and frame backing onto fabric. Flip over to ensure the fabric is nice and flat.


Glue fabric around foam core and cork. On Wrong side. 


Your inside board is done. Now for the tacks
 Use the buttons covered found in the sewing accessories in the fabric department.  I chose the smaller size but you can use whatever you want.  Follow the instructions on the back of the package to cover your buttons.

Once you have made your buttons you need to cut off the button shanks to give you a flat surface to glue the tacks on. 
Glue your tacks on the backs of your buttons with E6000 Glue.  They will need to dry over night. 
Next
Place your wrapped cork into the frame.


Add your tacks and your done.

This is a quick project you can make in an hour or so and easy for the kids to help.  Wrap it up and your ready to go. Use it for a teacher gift, kids bedroom, family command center or anywear you need to cover some space.

Enjoy!


52 Mantelsfive days five ways  feature friday free for all

Tuesday, April 10, 2012

Washi Tape Coupon holder


I have been thinking about another Washi Project.  I found these Coupon file envelope thingy's at Michael's along with some more Washi tape.So here it is!


Supplies:
Washi Tape
Accordion folder
I found these in the $1 section at Michaels
optional:  sticker letters or vinyl


Here is the Washi Tape I found at Michaels. 
The Brand is Recollections and they call it Crafting Tape.
My other Washi Tape is from Target and Mindy Maes Market.


I just cut the tape into strips and layered it on the folders.
It took me about 5 minutes.


Next I used my Silhouette and cut letters out to spell Receipt and Coupons. I layered them over the Washi Tape.


A great little folder for my coupons and receipts.
A little Pizazz in my Purse.


Thursday, April 5, 2012

Knobby Necklace

A friend found this adorable knob necklace a small boutique in Utah.  It was adorable.  The price not so much.  So we went out hunting for the supplies to make one.  It is kind of one of those personal preference kinda projects where no two will be the same.  So here is my {Knobby} Necklace


I found my knob on line at Mindy Mae's Market.  I used my others for cabinet doors.  This one was perfect for a necklace.

You have to get a knob that has a whole all the way through. 
Sometimes they are called curio knobs.


This knob was purchased at Hobby Lobby. 

Not to bad for a cabinet knob.
Right???


Thursday, March 15, 2012

We all scream for {Ice Cream!} Felties

I love all the cute Felt food. But oh the time.   My little girl loves to play in her little kitchen.

I have seen lots of felt food tutorials. Super cute ones.  But never came across felt ice cream so here it goes..


Pin It


Friday, December 9, 2011

It's a Wrap! Neighbor Gift

A few years ago, on Christmas Eve, a neighbor brought by a roll of wrapping paper, a roll of tape and a small plate of treats with a little typed tag attached. so I made up this cute little tag here to share, with a little improvement.


{Right click and save. Prints as a 4x6}

 I have been searching for this little tag for years and finally found it.
I loved the idea. And who doesn't need a little extra wrap and tape on Christmas eve.

{If you already have plans for this years neighbors gifts, Plan for next year and pick up your paper and tape at the after Christmas sales.  Your gift will be a hit next year}

Hope your Holidays are Merry and Bright this year!

PLEASE follow the following rules for Free Time Frolics printables:

  • I would love for you to become a follower of Free Time Frolics. More Free Printables are comeing. You don't want to miss out.
  • Free Time Frolics printables are for PERSONAL USE only. You may not re-sell, re-distribute, or claim them as your own.
  • If posting on the internet, you MUST post a link back to the original post or this page.
  • Freebie printables are offered "as is" unless otherwise noted.
  • Pin, share, use in your home or as a gift. Enjoy.

Adrienne

Wednesday, November 16, 2011

Home Made for the Holiday {Grand parents}

I have this Wonderful, Crafty Neighbor.  She is amazing.  She doesn't have a blog to follow cuz she is busy teaching her 5 girls how to craft, cook and sew. And let me tell you, those girls (the older ones of course) craft, sew and cook just like there Momma. Amazing!!! I don't know how she does it.  
So I asked my friend if she would be willing to help me out with our Hand Made for the Holidays.
(secretly I really needed this tutorial so I can make one of my own)

She has been making these for a bit and I just love them.  Each one has its own personality and a little something special about it.  Any Granny would be Tickeled Pink to have this beauty to wear.  So here you go.. Click on the link and it will take you to a Google doc with step by step to make your own.


Today's Tutorial is brought to you by Pick Your Plum. (If you want to check our Pick your Plum click on the link on the right.)  I love this company.  Awesome crafts supplies at half the price. They do an item a day for great prices.  I love getting up in the morning (7am MST) and seeing what's new. I am kind of an addict.  For 2 reasons: 
 1. I am a craft addict.  If I see something that is cute, easy, and my style I will buy it.  
2.  There prices are so good. I can't pass the up.  I love making crafts for a bargain.  

I have several Projects I have made with Pick Your Plum items and some just waiting to be used (Mostly cuz I loved the item and didn't have a purpose. Yet... But the price was so good!)

One of the items are these beautiful charms used in today's post. Here are a few others.
Hair Clips

Earrings

Vinyl
Chalkboard and Dry Erase Vinyl

I also have a  nice box  full of goodies I am still trying to decide what to do with.
(It was a Saturday special grab bag.  It was like getting an early Christmas. Yipee for me!)


Today's Giveaway is something special.  A little bit of everything. 
You get a set of 4 frames from this post.
2 pairs of paintable earrings
and
10 of the hair clips (shown above) to make your own creations.
To win this You have 3 chances:

1. Become a fan of Pick Your Plum on Facebook.

2. Sign up for there daily newsletter.

3. Become Follower or "Like" Freetime Frolics on FB. 

Easy. 3 chances to win.
Please leave a comment for each entry. Entries close on 26th. 
Related Posts Plugin for WordPress, Blogger...