Web Toolbar by Wibiya Free Time Frolics: holiday
Showing posts with label holiday. Show all posts

Friday, December 14, 2012

Chocolate Mousse Balls


These little lovelies are a family favorite.  They kind of don't last a day in our house. These yummies have 2 simple ingredients and come together in about 30 minutes.

4 large chocolate bars (6 oz each or larger)
1 large Cool whip
Nuts
coconut
Nilla wafers

Break up chocolate bars in to pot or microwavable bow.  Melt chocolate on low heat in double boiler or in Microwavable bowl.  Stirring every 30 second or so until melted.

Fold cool whip into melted chocolate. Until completely mixed.

Let sit for a bit to allow the chocolate to solidify a bit.

Next using a cookie scoop or spoon, scoop mixture into balls and roll in nuts, wafers or coconut   I think they would be super yummy rolled in potato chips. Place rolled ball onto wax paper.  Place in cool place to set up.


Enjoy a few for yourself and share a few with your neighbors.  They melt in your mouth!!

SixSistersStuff.com

Friday, December 7, 2012

{Adore Him} Mantel


This years Christmas Mantel is is all about Nativities.  I love Christmas Nativities.  I have been collecting them for years.Countries like the  Czech Republic, Mexico, Spain and Russia. I only have a few, but I really cherish them.  The Framed art is a gift from my Husband for our First Christmas together. I added Vinyl for the "Adore Him" on the Mantel wall.  So here is my Adore Him Mantel!


I added my Little People Nativity for the kids and our Santa village.

 I used my "He is the Reason" Printable and my Shadow Box Nativity to top off the Mantel. You can find them Here and Here.
Pin It
SixSistersStuff.com52 Mantels

Monday, December 3, 2012

8 Maids of Milking

Thanks Holly and Nat for inviting me! I love this song!  I think this is one of the first songs I fell in love with as a kid at Christmas time. This was a bit of a challenge but here is what I came up with.

12 Days of Christmas_300


I thought it would be fun to have a quick and easy to go treat for Santa.  You know to go with his milk!

Here is what I did!!

Supplies:
Pringles can
card stock: Red & White
Gold and white glitter
Cookies or Cookie dough
Jug of Milk

Cover your Pringles can in red paper and tape or glue ends.

 I printed mine off on my printer.  After cutting your buckle and mustache, turn over to the white side of the paper, put a small amount of modge podge on both of them and sprinkle they with glitter.   Let it dry.


When dry use glue dots or glue to secure your belt, buckle and Mustache into place.

Add your tag and your all done!


Add a jug of milk and some cookies and you are ready to go. Santa will a have a little snack on the go!!

Want to make it a neighbor gift???  Instead of cookies, fill the the container with cookie dough and print off the poem.


To see the other 12 Days in the series click on the links below!


SNAP!52 MantelsMiss InformationSixSistersStuff.com

Friday, November 30, 2012

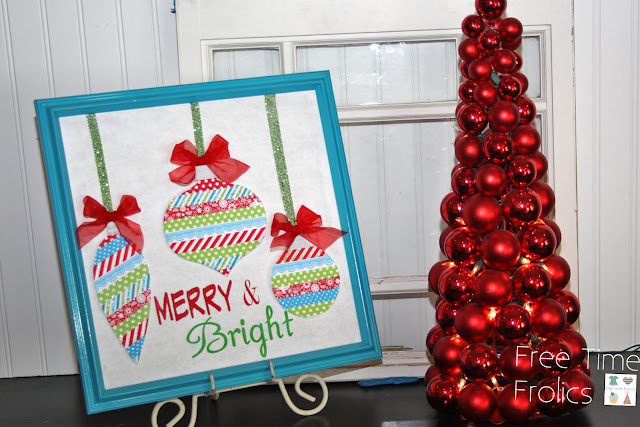
Washi Tape Ornaments


I love Washi Tape!!  I love to make projects with Washi Tape.  It is inexpensive and really packs a punch!  this season I decided to make a Washi tape Ornaments.

What you need:
Washi Tape (Michaels has great new festive tapes this season.  Just ab out any Christmas color you can think of, even gold and silver)
Foam core ( I get mine at the dollar store)
Exact-o Knife
Modge Podge
Frame
Ribbon
Opt: Vinyl saying

I first took an old frame I had and covered the glass with white paper. Missed this picture but you can just imagine it.

Next I found some ornament shapes on the Internet and printed them.  I flipped them wrong side up and covered the paper with washi tape.  Then cut them out.

Take some modge podge and glue the ornaments to a piece of foam core.  I got mine at the dollar store. Let the glue dry. Putting them on the foam core makes the jump off the page.  Not so flat.

Once the glue is dry use an Exact-o knife and cut around the edge of the ornaments. To give my ornaments a little sparkle and texture I used glitter glue pens to dot the polka dots, and lines on the washi tape. It is hard to see in the pictures but in person they look great.

Once your ornaments are cut out, place them on your frame.  I played a little with the placement until I liked it.


Add some ribbons for strings and bows with glue dots.


Once I got this far I thought I would be happy but I decided to add the Phrase Merry & Bright to my frame.  I think it finished it off perfect!!! I just love how it turned out.

Related Posts Plugin for WordPress, Blogger...