Web Toolbar by Wibiya Free Time Frolics

Monday, August 6, 2012

Cup of the Day {Organizer}

Do your have a Cup organizer for your kids??  With summer in full swing, my kids are in  and out of the kitchen.  I feel like we use every dish in the house, especially cups.  When the kids are in school I run the dishwasher once a day.  When they are home it feels like 2 or 3 sometimes.  So I looked around for a solution.  None of the ideas I have seen on the web seemed to work for my family.   So one day I saw this at TJMaxx for just $2.99.  It is a drawer organizer. Washable and it is the perfect size to fit on my counter top and hold the cups we have in our home.

I added vinyl letters to distinguish a slot for each kiddo and its ready.  One for Mom and Dad too.
Finally something to keep my summer days less messy!  This little tray has really cut down on dishes and doesn’t take up a lot of space. I love that they can grab a quick drink and head back to play without making a mess.
Like this tip??? Here are a few others you may like.  They make my life so much easier.
Like my blog. Come follow me. You can find me here:


Wednesday, August 1, 2012

technorati

b7a787931bbd3b73e853b0dfc3cfdb48f371613ddc057ffed1459d03118cd3f4beab4c3655b9dbd6

Kitchen Makeover

Welcome to my Kitchen Makeover. We purchased our home a couple of years ago.  I looked at so may homes and fell in love with it the first time I saw it.  It took a little convincing for my husband, but I did it.  The home was in foreclosure.  Our relator told us the home has great bones but needs some work.  I walked in and could picture it as my home.  Lucky for my I could see past the flaws.  A large mudroom and pantry are my favorite features.  I had dreamed about my mudroom. Lockers for each child, fold out ironing board and wash basin.  I love it.  My kitchen on the other had is nice but way to much wood for me with 4 different stains or paint in one room. Some of the features I love are under and over the cabinet lighting. We have lights that can be turned on that are above and below the wall cabinets.  It makes it hard to decorate above the cabinets but that means less dust bunnies for me to find. Here is what it looks like.
kitchen1kitchen
I started with the bead board backsplash. 
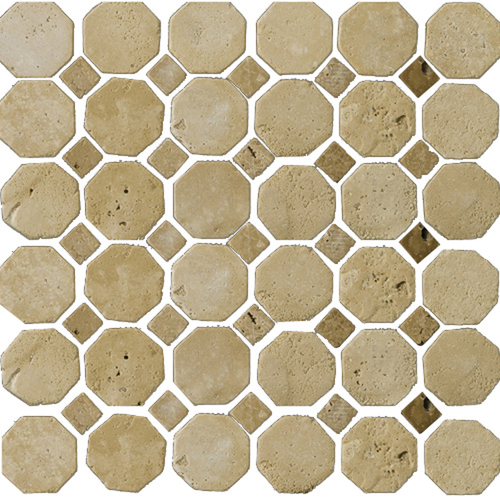
I chose a hexagon subway tile. I found it at Lowes.   The style is the same but my tiles were all white.  Then every now and then I would cut out a small square tile ands replace it with a colored glass tile.
Zoomed: Emser 12" x 12" Octagon Beige/Mocha Travertine Tile

Here is the kitchen with just the tile done.
kitchen2
Already a huge difference. Almost enough to stop there but I needed a little color. So I painted my Island. My front room is in Dark Turquoise (I{heart} Turquoise) and Burnt Orange.  So I painted my Island the same color as the wall above my fireplace to help tie the 2 rooms together.

I love th Bright pop of color it askitchen3
I love the pop of color is brings to my kitchen.  It is amazing what a little paint can do!
The last phase of my kitchen make over was the ceiling.  Did you see the wood slat ceiling.  I love the wood slats but the honey color was not my cup of tea.  I thought that white paint would help brighten up the room.  I also had 3 pendant lights.  2 were broken.  They also broke your line of vision when looking into the kitchen.
So I painted the ceiling white. Took the Pendant lights down and replaced it with a ceiling light box that matched the bead board oven hood.
Here is my finished product.
kitchen
So there is my kitchen.  Maybe it will inspire you to create something great. 


52 MantelsVisit thecsiproject.com

Monday, July 30, 2012

T-shirt to Backpack

Do yoru little ones need a simple backpack for Preschool?? Or just need a cheap backpack to match the big kids?  Well i have a solution. While shopping at the dollar store I ran across a basket full of kids t-shirts.  I bought a few in hopes of a potential project.  I came up with this.  You can use any T-shirt old or new.
backpack tshirt
You will need only 2 supplies a t-shirt, 3 yards of ribbon and a sewing machine. I have found the no matter the size of your child, the best size for these packs is a medium or smaller.

backpack tshirt1
Start with your T-shirt and turn it inside out.

backpack tshirt2
Fold your t shirt in half. Cut along the tip of the shirt, cutting off the neck hole of the shirt.

backpack tshirt3
Stitch along your cut edge.

backpack tshirt4
On the bottom of the shirt you will need to find the 2 sides of your shirt. make a small cut, not cutting through the seam.

backpack tshirt5
Take your ribbon and cut into 2 pieces.  Take your first piece and thread through one of the slits and around the casing. Bringing the ribbon back to the original starting spot.  Repeat this with the second ribbon threading through the opposite slit.

backpack tshirt7
backpack tshirt6

backpack tshirt8Bring your ribbon ends to the shirt sleeve.  Pin into place and stitch the opening closed.
backpack tshirt9
An easy day bag for your kids to go to the park, beach or a road trip. Or your sweet little one who wants to be a big kid too. Fill it will all the things you need and go! Have a great week!
name tag
Related Posts Plugin for WordPress, Blogger...