Web Toolbar by Wibiya Free Time Frolics: Girls
Showing posts with label Girls. Show all posts

Monday, October 15, 2012

Please Welcome {Grits & Giggles}

I'm Jenilyn, author of Grits & Giggles. I love to share my adventures in sewing, crafting, and being a mommy! I'm so excited to be at FreeTime Frolics today to share with you how to put together a TuTu Dress fit for a princess!

My daughter's favorite song is "You Are My Sunshine". She sings it all day and it never gets old to hear! She loves to dress up and twirl, so I knew for Halloween she needed a sparkly tulle dress. I wanted it to be golden and beautiful, just like the sunshine in her favorite song. 


Let's get started!

Materials:
1" Elastic
Tulle- 100 yards for a 2T size
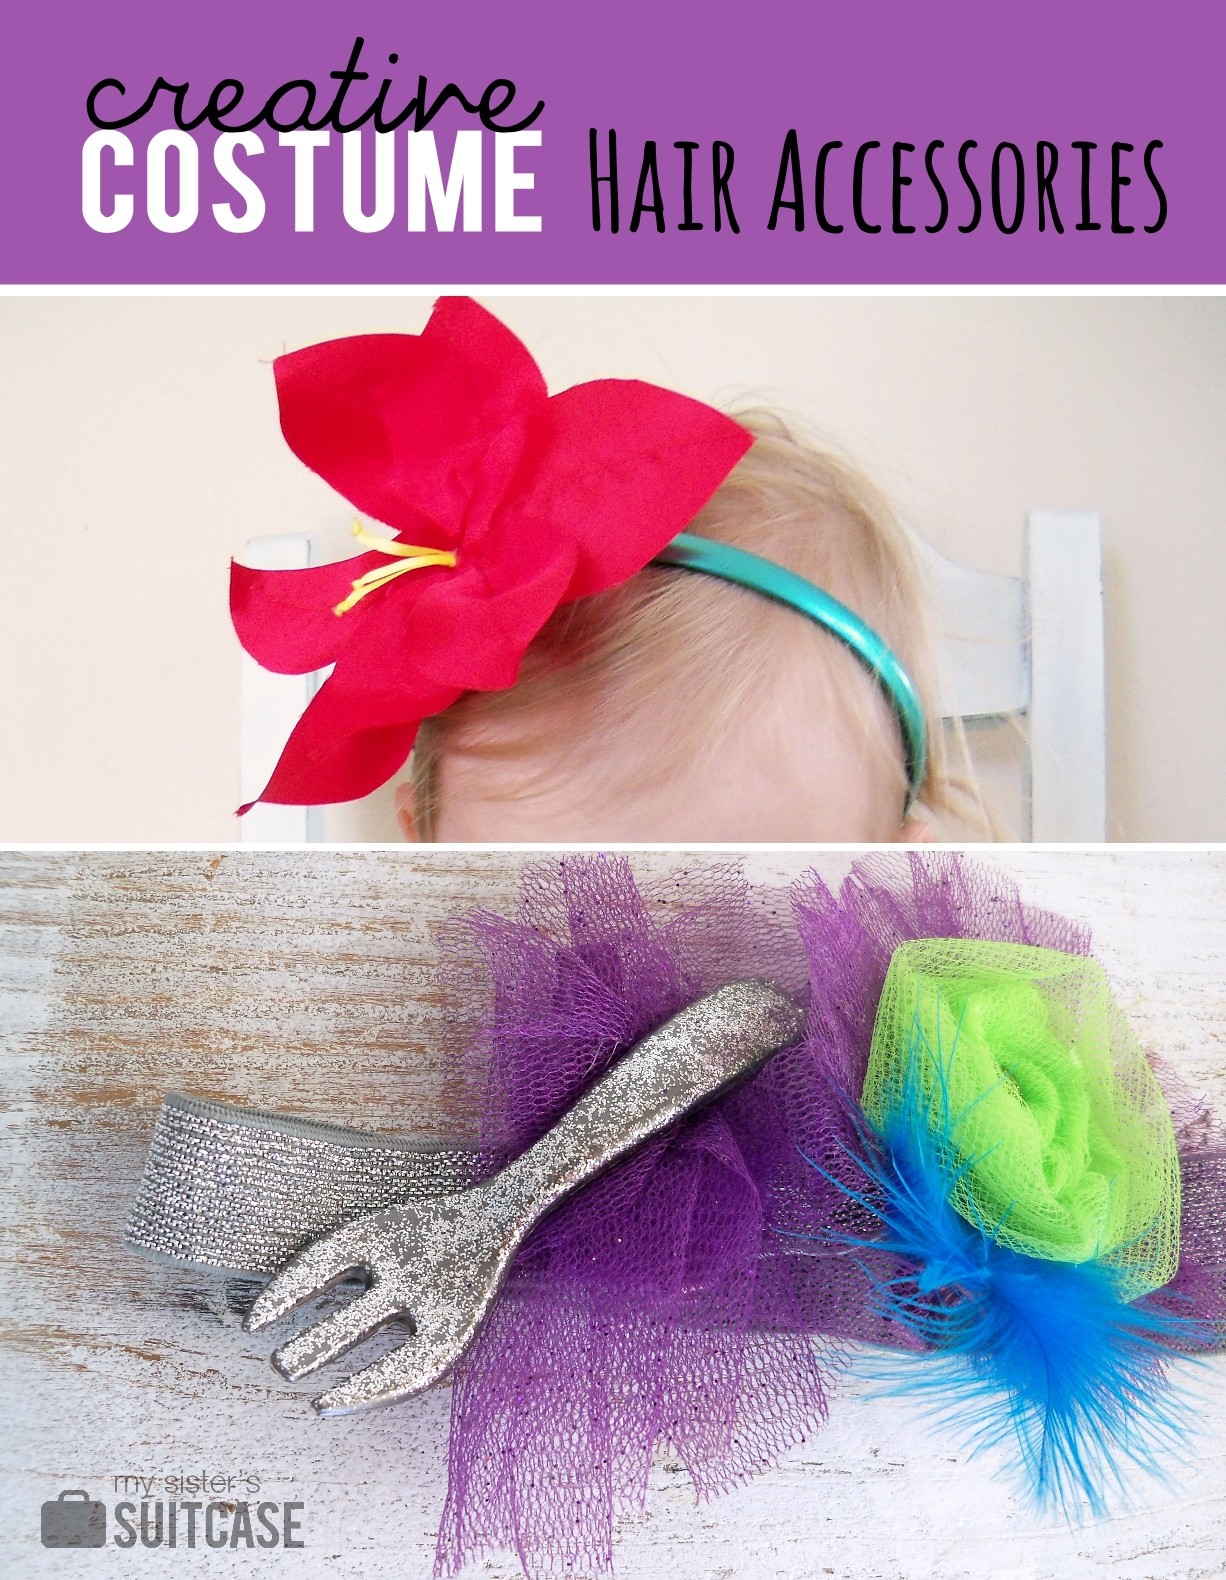
Flower Clip
Coordinating Ribbon


Measure around your little girl's chest. This is your elastic length. Overlap by 1" and sew the ends together. You want it fitted, but not too tight. 


Measure her height from her chest to where you want the tutu to fall. Multiply this by 2 and add 3". This will be your tulle length.
ex: my measurement was 20"....so my tulle length was 20x2+3= 43"

Cut strips of tulle this length and the width of your spool. You will need a LOT, especially if you use a light color. 


I place the elastic band around my leg for support. Place 2-3 strips of your tulle, in different colors, together and fold in the middle. Slip this under your elastic band.


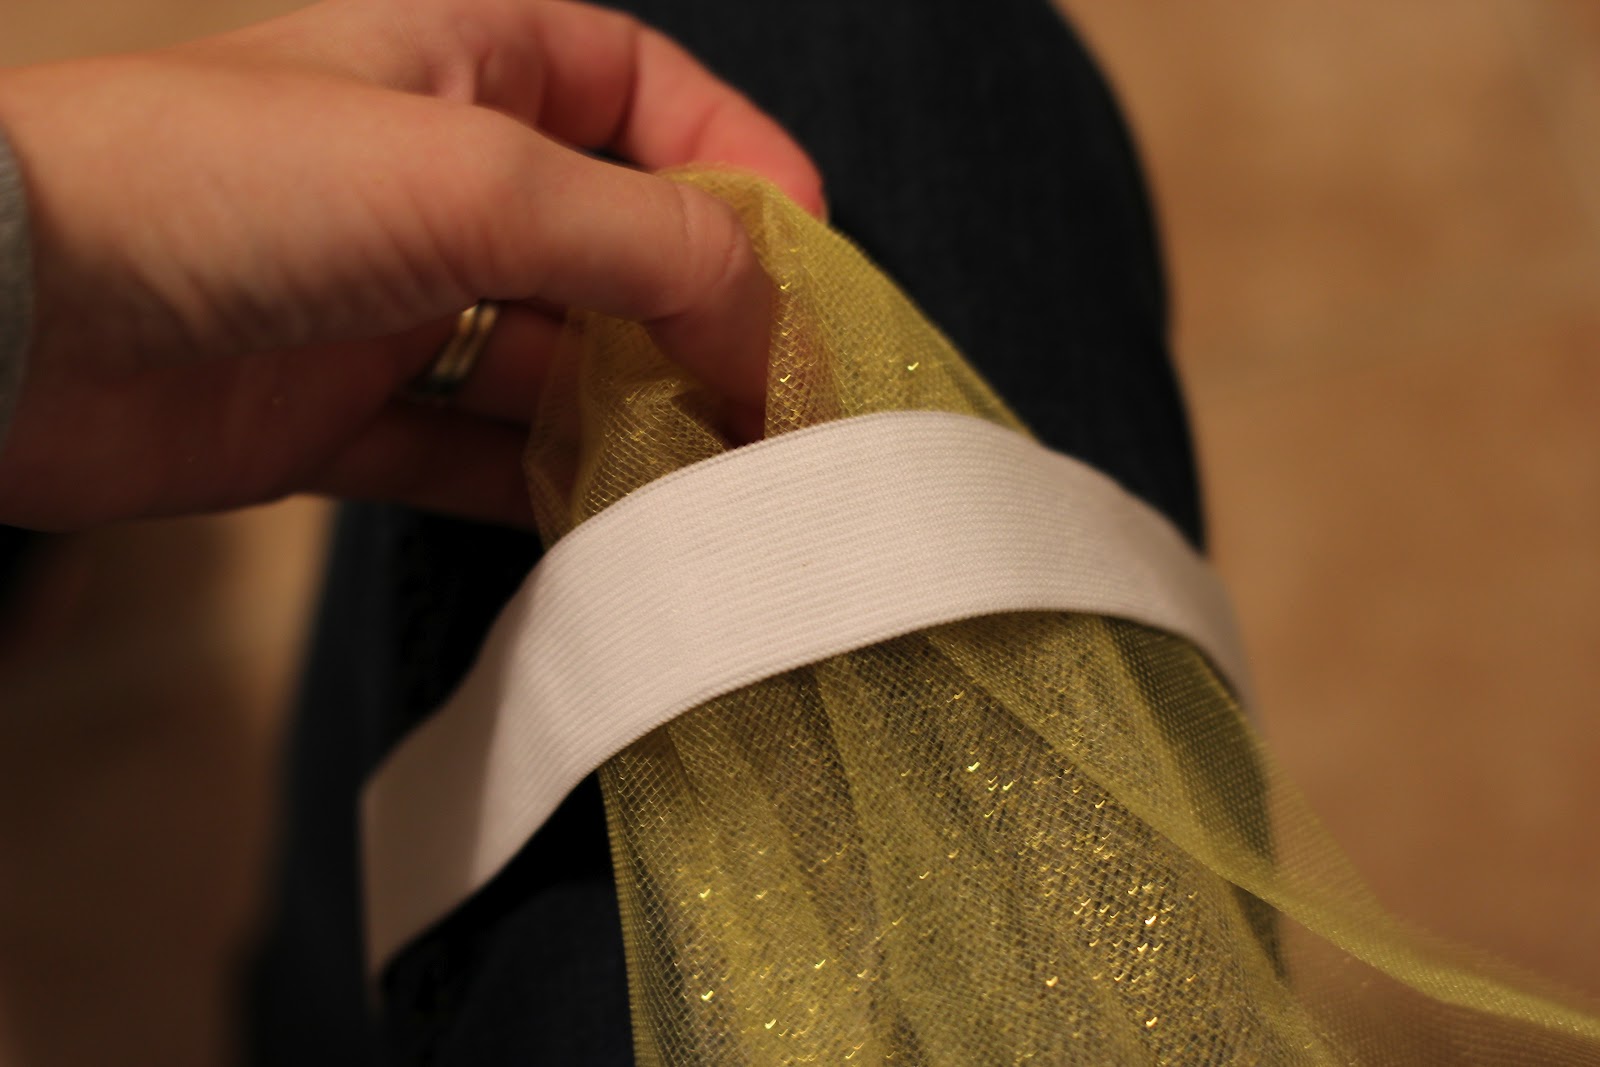
Then pull the ends of the tulle through, creating a knot. Don't pull it too tight yet, as the elastic will stretch when you do. Wait until you're finished to tighten. 


Continue tying these knots all the way around the elastic, alternating colors and combinations. Gently tighten your knots when you're done. 


To add a halter strap, cut a long length of your ribbon, and tie a similar knot, between two knots of tulle. 


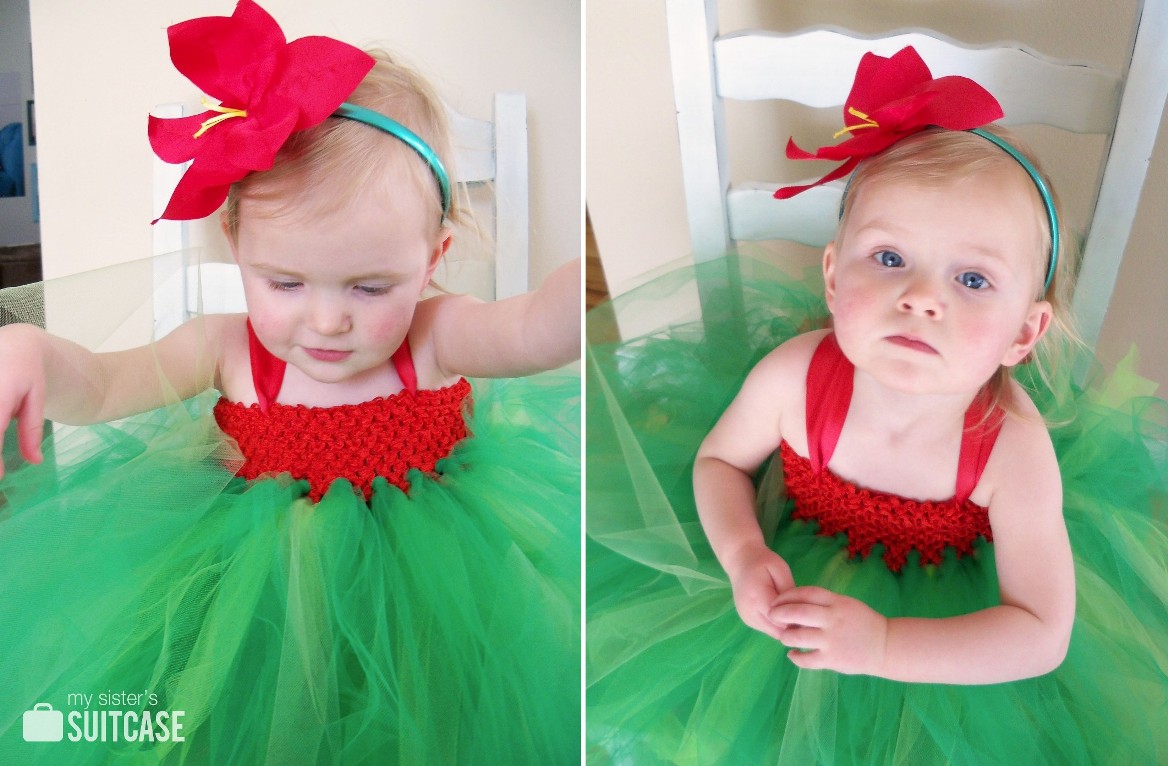
Clip on your flower clip and you're done! Your tutu dress is ready to be worn and twirled in!


It flows beautifully, and sparkles in the October sun.


Thanks again for having me from Grits & Giggles!

Check out some of my other Halloween and Fall Tutorials!
Thanks Jenilyn.  I love these tutu dresses.  They really pack a punch.   If you haven't been over to Grits and Giggles.  She has lots of great tutorials.  Head on over and take a look!
This post is Sponsored by:

Tuesday, October 2, 2012

Please Welcome {My Sister's Suitcase}

Hello Masquerade Ball guests! We're Nat and Holly from My Sister's Suitcase, and we are so excited to be judges for Adrienne's costume contest. Today we are sharing an easy way to get a custom look for your little girl's Halloween costume this year... by making a fun hair accessory!

Last year, I made several Disney-themed tutu dresses to sell at a local boutique. Some of my inspiration was found on Pinterest, but there were a few looks that I came up with all on my own!

Here are two of my favorite costumes:

I made an Ariel {Little Mermaid} dress for my daughter, and a Lilo {from Lilo & Stitch} dress for a client of mine. (Suzanne is a photographer and bought several of my tutu dresses to use for photo shoots.) When I am coming up with ideas for my designs, my favorite part is thinking about how I can make a fabulous hair accessory to put the dress "over the top!" For the Lilo costume, I wanted to create an over-sized red hibiscus flower to add a little drama to the outfit.
I used some red satin-type fabric, yellow satin ribbon, and a headband from the dollar store. To create the flower, I cut seven petal shapes out of the red fabric and stitched a seam down the middle of each petal. I added three small pieces of ribbon {with the ends knotted} to make it look like the stamen in the middle of the flower! I carefully glued all the petals together in the center, with the ribbons coming out of the middle. The flower was attached to a red felt circle and slid on to the headband. That way you can adjust the placement of the flower depending who is wearing it! I love how it turned out:
For my Little Mermaid costume, of course I had to incorporate a Dinglehopper!
I found one of my little girl's play kitchen forks, spray painted it silver and added a layer of glitter paint on top. I added some purple tulle underneath {to match the dress} and glued it together. I had a separate clip for the dinglehopper, so you could choose either that, the flower, or BOTH!
If you are looking for a way to spice up a store-bought costume this year, or customize your own costume, a homemade hair accessory is the perfect solution!
Thanks for having us today Adrienne! We can't wait to see all of the homemade creations you guys come up with :)

Thanks Nat and Holly. I am in love with the "Dinglehopper". If you haven't been over to see them you need to.  There blog is full of wonderful projects.   Head on over and check them out.


This post is sponsored by:
Photobucket

Monday, October 1, 2012

Spider Hair Clips

That time a year is rolling in.  A month where you can get away with a little more than the norm.  I love Halloween and the fun things my kiddos get to experiment with.  They just get to be kids and have fun. 
I love experimenting with my Little girls hair.  (Frankly I am not very good a t little girl hair.  Probably why I only have one girl}   I am more of a pony tail mom! 
This year I wanted to make something different for her hair.  The usual bows are great, but I wanted off the beaten path kind of thing.  So I came up with these.  Big black fuzzy spiders for here hair!


Want to make a few of your own? Here is how you do it!
Supplies:
Black pom poms
Wood skewers
Googly eyes
Black ribbon
1/8 inch ribbon for bows
Hair clips
Hot glue

Start by wrapping ribbon onto a skewer tape off the ends. Depending on how many you are making you will need 1-2 skewers of ribbon for your legs.  Place on cookie sheet in an oven on the lowest setting. Bake for 20 minutes. This is the same method you use for making Corker hair bows.

While your ribbon is baking start by wrapping your hair clips with black ribbon

Add 2 googly eyes to your black pom pom. Set aside.

When your ribbon is ready unwrap from the skewers. They should be like a curly corkscrew.

Mine were really long and I was able to get one spider from 1 wrapped skewer. I folded the ribbon in half and then in half a gain. This gave me eight legs. Glue legs to the center of the clip.  Wrap a small piece of ribbon around the curly ribbon and the clip to hold secure.
Add a bit of glue to the top of the legs and add the pom pom.  Add a cute bow and your are ready to go.

You could even use them to decorate a shelf or a mantel.

Have a Spooky Month!! And don't forget to enter the Masquerade Ball.  The Link party has begun.  Please stop by and add your handmade Halloween costume.  I would love to see what you have made!

Have a Spooky Month!! And don't forget to enter the Masquerade Ball.  The Link party has begun.  Please stop by and add your handmade Halloween costume.  I would love to see what you have made!


Free Time Frolics

I Heart Nap Time

Tuesday, September 25, 2012

Please Welcome {Brassy Apple}

Here to help kick of the week is Megan from Brassy Apple.  She is amazing.  I love this amazing costume she made for her daughter.  To see more of Megan check out here blog.  Brassy Apple was one of the first blogs I ever followed and read. I kind of have a crush on her.   I recently got to meet her and I love even more now!  If that is even possible...

Hello hello! It's Megan of Brassy Apple! Super excited to be able to share my DIY Halloween Costume with you! Want to find more from me?.....Check out my links at the bottom of this tutorial! Enjoy!!


supplies: 
2 pieces of foam core board
cutting tool - exacto knife/box cutter, etc
fabric(s)
spray adhesive
tape
fabric marker (optional) 
yard stick (optional)
pencil
elastic? 
hotglue

(Depending on how tall your daughter is will determine if you need 2 pieces of foam core or 1)

Step 1: Place the 2 pieces of foam core together on the ground/floor. Have your daughter lay on the boards. I lined up her waist with the bottom of the first piece so I could cut a top out). Don't trace around her arms. Just her shoulders and sides and down along her hips. You don't have to press hard with the pencil. This will give you an idea of where to draw the outfit and how wide to fit her. 


Step 2: DRAW the outfit! Give yourself a general outfit to follow and cut out. This part is all up to you! Puffy sleeves, no sleeve, blouse-y look, tailored, etc. Remember to add the TABS to give it the paper doll look!  You will need two TABS for the shoulders and a few around the bottom part of the outfit too. I used a folded post it note to trace so my TABS were all the same size. (It might be helpful to tape the 2 pieces together a bit to make the outfit a smooth transition) I also used my yardstick to make some nice straight lines for the skirt. TIP: straight lines are easier to cut than curvey ones.


Step 3: Cut it out. Remember the lines you drew will be covered up by fabric! My box cutter cut very smoothly and easily through the boards.


Step 4: Tape/Secure the two pieces together so the two pieces are more stiff and connected as 1 piece. 


Step 5: Pick your fabrics! Mix it up - keep it solid. Whatever you fancy is - go for it! Lay your fabric right side down and turn your foam board over. Trace and cut with scissors! A fabric marker is helpful to trace on the fabric. Once it's cut, place it on the foam core again to make sure it's a good fit. Trim as necessary. 


Step 6: GLUE! Follow the directions on the bottle of spray adhesive to apply your fabric. Let dry. 

Step 7: Embellish! It's fun to add layers for a more polished look. Just remember to add in FLAT layers - not dimensional. If necessary - photocopy buttons, trim, etc to add to your outfit. If you add a belt to the outfit cut it extra long so it can be wrapped around your daughter as a way to help hold the costume on. Or attach some fabric or trim to the inside middle of the outfit as a "belt".


Step 8: Using hot glue you can attach 2 loops of elastic near the shoulder area. Use your daughter as a measure of where they should be placed and how large. These loops will make the costume easy to slip on and comfortable to wear. Don't make the loops too big that the costume sags (the belt in the middle is a good back up to keep the costume in it's place).  TIP: we found we didn't need elastic loops so try the belt option first and see if it works! 


DONE!!! You can create a hair accessory in paper doll style as well to match your outfit if you'd like! Don't forget the TAB. It could easily be attached to a headband to wear! Finish off the outfit with leggings, tights, shoes etc!


TIP: don't make it too long because it can be a bit hard to walk in with the stiff foam board hitting your daughters knees....lesson learned! 
We don't want any trick or treaters falling over or having a hard time! 

----------
I hoped you enjoyed my tutorial! - Megan
Connect with me to find out more! 
and my weekly Refashion Web TV show!

Thanks Megan and your adorable Brassy Blossom. I love your tutorial. For more costume and Halloween Ideas please come back tomorrow!  Don't forget to enter the Masquerade Ball giveaway.

This post is Sponsored by:
Related Posts Plugin for WordPress, Blogger...