So you remember those figure 8 ponytail elastics. You know the ones with the huge knobby balls on a figure 8 elastic?? I have been looking for them for my little miss. They are really hard to find. I couldn't even find a vintage picture of them. But them my mind started thinking about how I could make them myself. With a trip to Joanns, I found the round elastic, by the yard. They also sell the button covers. I had some in my stash. Next was trying to figure out how to make them a figure 8. After searching and pondering I hit the hardware store and found a few options that could work. Here is what I came up with.
Showing posts with label crafting. Show all posts
Showing posts with label crafting. Show all posts
Friday, July 27, 2012
Tuesday, July 17, 2012
My Little Unicorn
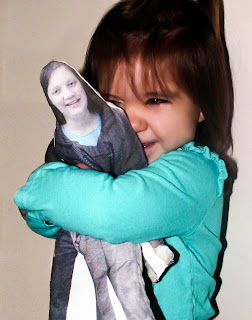
A few months ago my our family went to Lava Hot Springs for the day then off to Golden Corral. My kids were in heaven when they saw the buffet. What kid wouldn't love it. The best part for them was the cotton candy. After it was all gone the paper cone that the cotton candy was on became her unicorn horn.
My Little Miss is obsessed with Unicorns right now. So I thought it would be fun to add a Unicorn to her dress up box. I also think it would be fun to use it for Halloween. So here is what I did.
Supply List:
Felt- 2 colors if doing the ears
headband
needle and thread
Glue gun & Glue sticks
Coordinating trim
Safety pin
a bit of stuffing
ribbon (Optional)
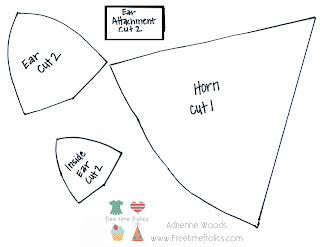
Horn Pattern (Here)
Cut the horn and ears according to pattern pieces. Cut 2 of each ear piece and attachments and 1 horn.
Layer ear pieces. Large and 1 small. Stitch a basting stitch along bottom of ears combining pieces. Pull to gather and tie off. Set aside.
Roll your horn to make a cone shape. Over lap the edges and pin them together. Slip stitch the edges together.
With your trim, start at the top and wrap it around your horn. Stitch or glue it to the inside pocket at the bottom.
Add trim around the ears.
Your Unicorn horn and ears are all done and ready for playing.
My Little Miss is obsessed with Unicorns right now. So I thought it would be fun to add a Unicorn to her dress up box. I also think it would be fun to use it for Halloween. So here is what I did.
Supply List:
Felt- 2 colors if doing the ears
headband
needle and thread
Glue gun & Glue sticks
Coordinating trim
Safety pin
a bit of stuffing
ribbon (Optional)
Horn Pattern (Here)
Cut the horn and ears according to pattern pieces. Cut 2 of each ear piece and attachments and 1 horn.
Layer ear pieces. Large and 1 small. Stitch a basting stitch along bottom of ears combining pieces. Pull to gather and tie off. Set aside.
Roll your horn to make a cone shape. Over lap the edges and pin them together. Slip stitch the edges together.
Lightly fill with stuffing.
Pinch in half. with stitched edge on the side. Slip stitch 1 inch section in the center.
Then bring sides into center and slip stitch closed. This will leave you a small pocket for the headband to thread through.
Slide horn onto the headband.
Glue felt rectangles to headband. One on each side of the horn.
Glue horn into place. I like to angle mine a bit.
To add ears, add some glue to the headband. place ear on top of blue. Then add a strip of glue to the front and back. Pull felt around the headband and onto the ears.
Add trim around the ears.
Your Unicorn horn and ears are all done and ready for playing.
Thursday, May 24, 2012
Photo Transfer Tiles from Those Crafty Sisters
The giveaway is posted below. Please be sure to checkout the other Birthday posts.
Today's post is from Linda @ www.thosecraftysisters.com.
What you'll need:
- 4" x 4" Tile: This works easier with unglazed tile , but colors are brighter with glazed. (I sanded the glazed tiles before transferring the photo.)
- Photo transfer paper
- Iron
- Water-resistant sealer
- Cork or felt tabs, if you are going to make the tile into a coaster
1. Print your photo on the photo transfer paper, following the manufacturer's directions. Cut around your image leaving a 1/2" border. Tape if upside down to the edge of the tile. This will help to keep the photo from slipping.
2. Preheat the iron using the highest setting (don't use steam!) and fold the photo back away from the tile.
3. Heat the tile: working on a protected surface, and using gloves to protect your hands from the hot tile, place your iron onto your tile for 1 minute.
4. Carefully flip the photo over onto the tile. Since the transfer paper smears easily when hot, you need to tack the transfer first by lightly gliding the tip of the iron across the back two or three times.
5. Iron it down: Using firm pressure, (and being careful not to move the transfer) iron the paper to the tile. Go back and forth, pressing firmly around all the image. Make sure to do the edges really well, because that's the area that seems to have the hardest time with the transfer. When you are finished, set the timer for one minute and do some deep breathing or something. You don't want to take the paper off too soon, but you also don't want to leave it on too long or the paper will get stuck to the tile. (If that happens, heat the paper again and you should be able to get it off.)
You can see that the edges do not come off sharp and crisp, and the image has sort of an aged look to it, but I think that only enhances the end result.
6. Wait till the tile completely cools (at least 10 to 15 minutes), then seal the tile using 2 to 3 coats of sealer.
7. Attach cork or felt to the bottom if using for a coaster.
I just love the look of this! I can see a whole row of tiles lined up across a back splash or several grouped together in a frame. I'm planning on making a tile planter for a friend, and I'm definitely going to incorporate this technique.
If you like this project idea, you would love the book that I got the idea from. There are 50 projects, and they're not your regular run-of-the-mill projects either! Just a few I plan to try: mirror frame, plexiglass accordion frame, rice paper screen and even a shower curtain! I don't usually purchase real hold-in-your-hands books for diy stuff any more, (that's why we have the Internet, right?) but in this case I'm glad I broke down and got it.
In celebration of Free Time Frolics' Birthday, one lucky reader will receive a copy of Photocraft, Cool Things to Do with the Pictures You Love (which is my new favorite how-to book).
Thanks for looking, and Happy Bloggy Birthday to Free Time Frolics!
~Linda (aka, Sister #2),
Here are a few popular posts from there blog!

Want to see the Prize Package??? Check Here.
Wednesday, May 16, 2012
Covered Corkboards
On to this week.
Teacher Appreciation was last week and I am a little behind. I have had this one in my cue for a while needing 1 picture. I finally got it done. So here is a quick easy teacher gift you can do with afew supplies from you home and a couple of dollar store items.
Supplies
Piece of Cork
Frame
Spray paint (optional)
Spray Adhesive
Tacks
Buttons to Cover
Fat quarter or enough fabric to cover your cork
E6000 Glue
Glue Gun w/ Glue
Frame backing or foam core
2 or 3 fabric scraps (2x2 squares) for tacks
Start by spray painting your frame is you are changing its color. This can be drying while you make the inside.
Start by Cutting your cork to the inside size of your frame. Take fabric and cut it 1 inch larger around cork. Iron your fabric nice and flat to get out wrinkles.
Spray adhesive onto wrong side of fabric. Layer cork and frame backing onto fabric. Flip over to ensure the fabric is nice and flat.
Glue fabric around foam core and cork. On Wrong side.
Your inside board is done. Now for the tacks
Use the buttons covered found in the sewing accessories in the fabric department. I chose the smaller size but you can use whatever you want. Follow the instructions on the back of the package to cover your buttons.
Once you have made your buttons you need to cut off the button shanks to give you a flat surface to glue the tacks on.
Glue your tacks on the backs of your buttons with E6000 Glue. They will need to dry over night.
Next
Place your wrapped cork into the frame.
Add your tacks and your done.
This is a quick project you can make in an hour or so and easy for the kids to help. Wrap it up and your ready to go. Use it for a teacher gift, kids bedroom, family command center or anywear you need to cover some space.
Enjoy!
Add your tacks and your done.
This is a quick project you can make in an hour or so and easy for the kids to help. Wrap it up and your ready to go. Use it for a teacher gift, kids bedroom, family command center or anywear you need to cover some space.
Enjoy!
Monday, May 7, 2012
Basket Purse
I found this little basket bag at target in the dollar section. My target sold out of them but thy just got some. So hurry over and grab one. My little girl is a girly girl who love to play with the boys. So I gave her a girly bag for her dolls and cars.
Here is what you need:
Basket bag
5 x 45 inches of fabric
Tim Tex stabilizer about 10 inches
I started with the basket and 5 inches of fabric. The fabric will measure 5 x 45 inches. Fold in half and iron. Next I stitched a basting stitch along the raw edges.
Pull the bottom thread to lightly gather the fabric.
Cut your tim tex into a 5 inch circle. Start with your glue gun from the outside edge of your Tim Tex. Working around until you have reached center.
Once you reach center fold your raw edge and tuck it into your flower. Add a button. I just glued mine in.
This is what it looks like from behind. I used some hot glue to attache it to my bag.
Super simple.
It's perfect size form my little miss. She fills the bag and off to the park.
Linking up too:

Subscribe to:
Posts (Atom)


