Web Toolbar by Wibiya Free Time Frolics: Guest Post
Showing posts with label Guest Post. Show all posts

Thursday, October 4, 2012

Please Welcome {52 Mantels}

Today I have a fun painting technique to show you as well as an easy Painted Halloween Sign! I'm so glad that Adrienne invited me over to participate in the Masquerade Ball. I love the fun costumes of Halloween and I can't WAIT to get inspired by you all! 


Painted Halloween Sign {using a charcoal transfer method!}

supplies:
unfinished wooden plaque
mod podge
paint brush
charcoal pencil
decorative paper (I used a chevron treat bag because I liked the pattern!)
an image to trace (I used this bat and added words. But, you could use any image you can print on plain printer paper!)
paint (I used black acrylic)


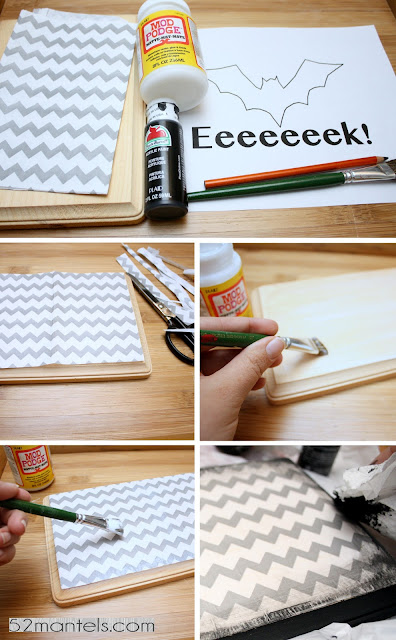
After gathering supplies, cut your paper to fit the plaque's face. Attach the decorative paper to the wood by painting mod podge under and on top of the paper. After the mod podge dries, take a cloth or paper towel and "paint" the plaque's sides with black paint. You could do this with a brush, if you'd rather. I wanted a rough, distressed look, so I dry-rubbed the paint on the sides with my paper towel, letting some come over onto the paper.  


To transfer your image onto your dry plaque, rub charcoal over the entire backside of your image. Place the image, charcoal side down, onto your plaque. Take a pen, pencil or sharp object and trace around the entire image. For the letters, trace around the edges. When you lift the paper, the design will be outlined in charcoal. So cool! 


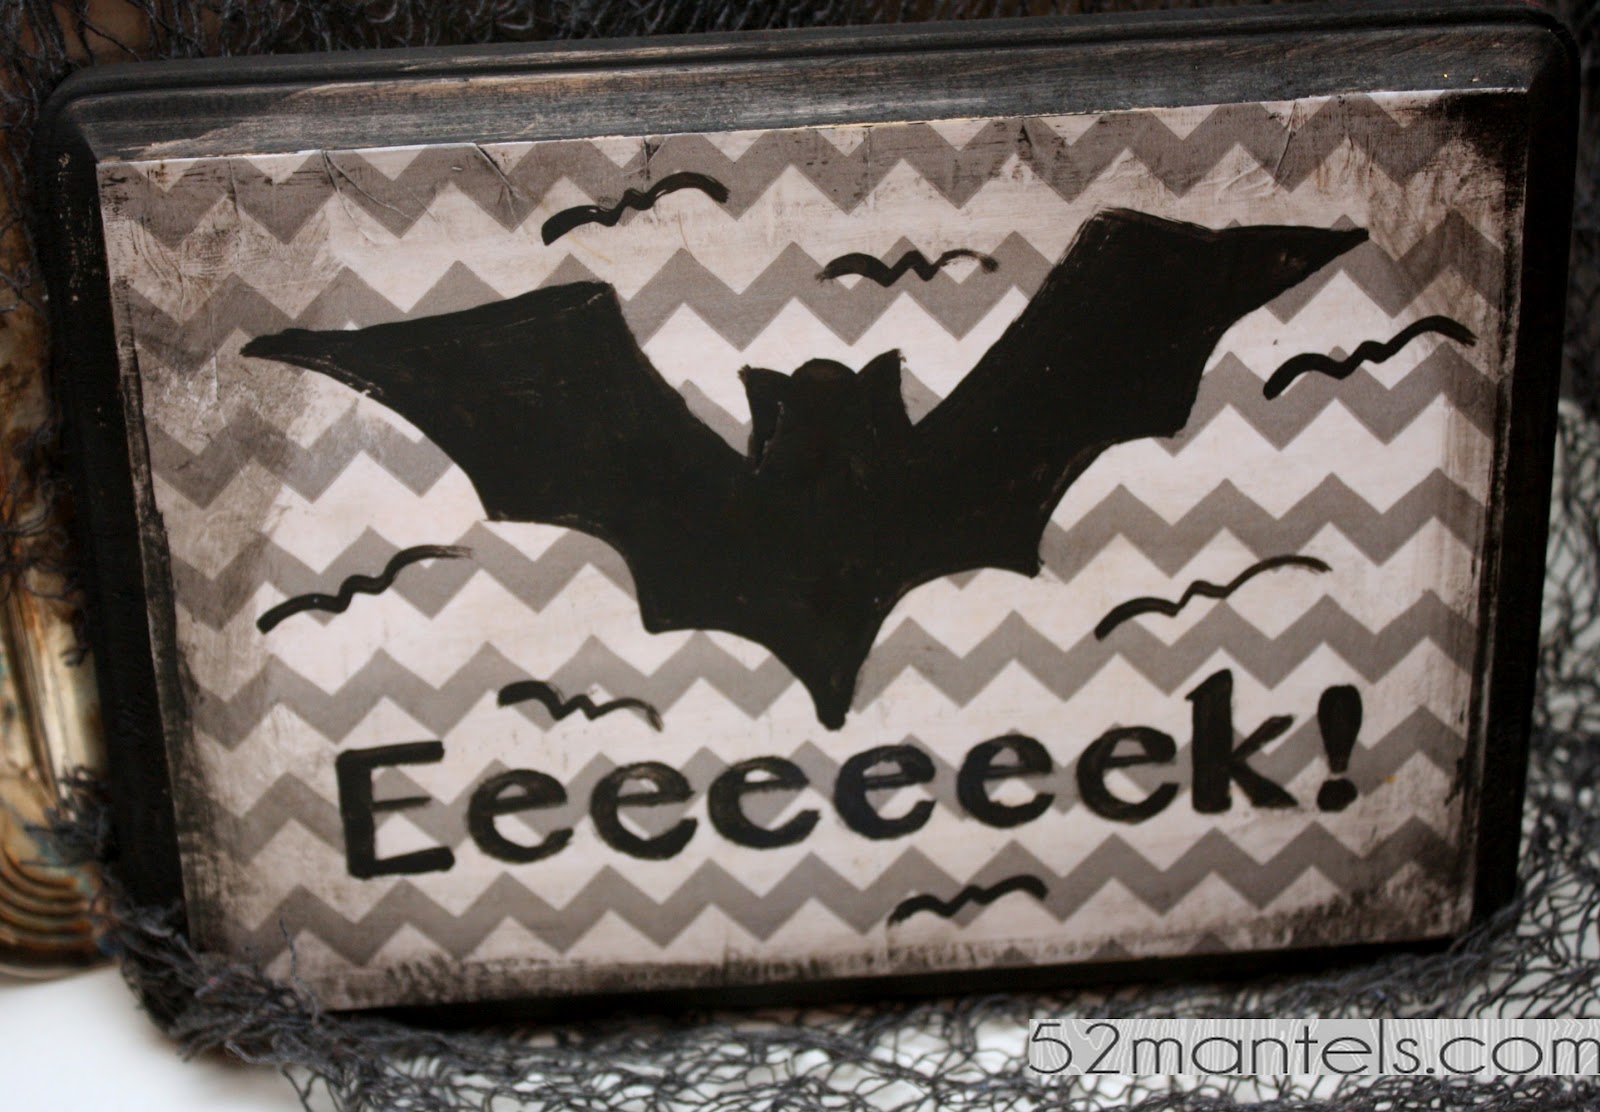
After your design is traced onto your plaque, take a small paintbrush and paint inside the lines. After my plaque was done, I painted on small, flying bats to add a bit more.

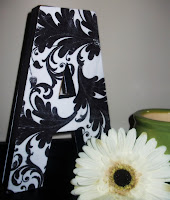
Wah-la! You have a hand-painted Halloween Sign! Now that you know this technique, you can use it for all KINDS of things! Get creative! 


You can find Emily at 52 Mantels a blog about all things home, including weekly mantel makeoversseasonal craftseasy recipes and simple DIY projects. Come over for a visit! 

                                         52 Mantels
52 Mantels
52 Mantels
52 Mantels
52 Mantels

A Big Thanks to Emily for Posting today.  What a fun project to do.  I may even have my older boys try that out!  Please head over to 52 Mantels and check it out.  So many great ideas!!! The Masquerade Ball Link Party is up and running. Se sure to add your Handmade Costumes!

This post was sponsored by:

Tuesday, October 2, 2012

Please Welcome {My Sister's Suitcase}

Hello Masquerade Ball guests! We're Nat and Holly from My Sister's Suitcase, and we are so excited to be judges for Adrienne's costume contest. Today we are sharing an easy way to get a custom look for your little girl's Halloween costume this year... by making a fun hair accessory!

Last year, I made several Disney-themed tutu dresses to sell at a local boutique. Some of my inspiration was found on Pinterest, but there were a few looks that I came up with all on my own!

Here are two of my favorite costumes:

I made an Ariel {Little Mermaid} dress for my daughter, and a Lilo {from Lilo & Stitch} dress for a client of mine. (Suzanne is a photographer and bought several of my tutu dresses to use for photo shoots.) When I am coming up with ideas for my designs, my favorite part is thinking about how I can make a fabulous hair accessory to put the dress "over the top!" For the Lilo costume, I wanted to create an over-sized red hibiscus flower to add a little drama to the outfit.
I used some red satin-type fabric, yellow satin ribbon, and a headband from the dollar store. To create the flower, I cut seven petal shapes out of the red fabric and stitched a seam down the middle of each petal. I added three small pieces of ribbon {with the ends knotted} to make it look like the stamen in the middle of the flower! I carefully glued all the petals together in the center, with the ribbons coming out of the middle. The flower was attached to a red felt circle and slid on to the headband. That way you can adjust the placement of the flower depending who is wearing it! I love how it turned out:
For my Little Mermaid costume, of course I had to incorporate a Dinglehopper!
I found one of my little girl's play kitchen forks, spray painted it silver and added a layer of glitter paint on top. I added some purple tulle underneath {to match the dress} and glued it together. I had a separate clip for the dinglehopper, so you could choose either that, the flower, or BOTH!
If you are looking for a way to spice up a store-bought costume this year, or customize your own costume, a homemade hair accessory is the perfect solution!
Thanks for having us today Adrienne! We can't wait to see all of the homemade creations you guys come up with :)

Thanks Nat and Holly. I am in love with the "Dinglehopper". If you haven't been over to see them you need to.  There blog is full of wonderful projects.   Head on over and check them out.


This post is sponsored by:
Photobucket

Thursday, September 27, 2012

Please Welcome {Uncommon Designs}

Hi everyone!  We are Bonnie and Trish, sisters-in-law and the creators behind the craft blog, Uncommon Designs.  We are so excited to be on Free Time Frolics today as part of the Masquerade Ball!
BOO yarn letters tutorial
Did you how much we love yarn...yep yarn! Now, neither of us knit or crochet but we sure do love to use yarn in other ways. We created these adorable "BOO" yarn letters with the help of a great tutorial by Let Birdz Fly and our inspiration was an incredible display over at  Eighteen 25.
We used smaller letters and instead of a cute little spider {Bonnie hates them has a mild phobia issue} hanging down, we made little, sparkly black bats "flying" off the letters!!
BOO yarn letters tutorial
We simply spray painted wooden bats black. Then after applying a layer of glitter glue, we sprinkled very fine black glitter all over them! {The photo just does not do them justice..really!} We twisted floral wire, which we also spray painted black, around a pencil {see my cute son's "I Love Math" pencil there!} and pulled it out just a bit. Finally, we glued the wire to the back of the bat with our handy-dandy glue gun! {seriously, what did we do before them!!??}
BOO yarn letters tutorial
  
Here is our sweet little "B" before the flying bats, it is fabulous as is...but...
BOO yarn letters tutorial
Doesn't it look adorable with the bats?
Bonnie and Trish
Thanks so much Adrienne for having us here today! We would love for you to stop by Uncommon and say hello! You can also find us on FacebookTwitter, and Google+ !  

 Join us each Wednesday for our "Uncommonly Yours" link party!

Thanks so much Bonnie and Trish!  I just love there site and those BOO letters are to die for!  For more great tutorials head over and visit and be sure to be a follower.  
For the Masquerade Ball giveaway click Here!
This post is Sponsored by:

Tuesday, July 24, 2012

Super Saturday Project Ideas

A few weeks ago I was contacted by Poppy Seed Projects.  The put together projects for you to do yourself or as a group.  They even offer group discounts. They have all kinds of ideas for decorating you home.  Picture frames, vinyl or holiday decor.  You will the love the selection. I could not decide what I wanted.  So I went a little over board.  Expect to see more poppy seed projects!   I was asked to do a little round up of Super Saturday Projects.  These are projects you can do with large groups of ladies on a Saturday afternoon. So set up a girls day and get crafting! So here you go!!!

1. I Love to see The Temple
I had this one in mind for my daughter.  It would make a great gift for that special Little Miss in your life. I was going to wait for Christmas to give my Little Miss hers but she saw it and fell in love.  Her favorite song to sing is I Love to See the Temple.  We sing it every night.


I made this into a gift bundle just for her.  Here is what I used.
Temple Memory game
Temple Block
I Love to see the Temple Printable (Here)
I packaged it as a fun little bundle.  Wrapped in a cellophane bag with shredded tissue paper and tied with a big bow.
 A fun gift for under $15

2. Ctr Block and Printable

This is option #1-
A great idea for a young man preparing for a mission or boy receiving the Priesthood.
 CTR Block
Printable of 1 Nephi 3:7
Add a new Tie.  
This little gift set adds up to less Than $10 plus our neck tie.  Wrap your gift using the necktie as part of the wrapping.
Option #2-
I love this idea and wish I had done this for my sons baptism.  I think this would have been great for a centerpiece or table decor for his family get together. Add your favorite Picture and you have something they can have for a life time.  Add a gift card for a CTR Ring or necklace.Do this for Girls or Boys.

For this little bundle I used:
CTR Block
Baptism Printable (Here)
Baptism Subway Art copy
Missionary Printable (Here)
Easy gift for under$10

3. Button Bracelet
Here is an easy and fun tutorial to make a beautiful bracelet from buttons.  Mom, Grandmothers, daughters or even your Visiting teaching ladies would love one of these.
Here is a quick supply list:
Buttons - Vintage or new
Some cute charms that have holes on two ends
jewelry glue or E-6000
jump rings or some kind of connector links
a lobster clasp
and pliers and crimpers

4. Quiet books
I just love photo quiet books.  They are simple to put together and my kiddos love them.  Here are a few to choose from.
Gospel ABC Cards
We Beleive
Book of Mormon (This one requires a little bit of work.  But is extremely cool.)


After printing them at a photo lab you can expect to spend around $6 or $7 each. Just add them to a photo book from the dollar section and you are ready to go.Usually Photo labs like Walmart or Costco will give you a discount if you order lots many prints.  Costco requires you to order more than 500 prints for a discount.  This will decrease the amount each book costs.

5. Monogram Letters:
I am super excited about this one.  I have been wanting a Monogram letter for my gallery wall.  Buy the First letter of your last name.  All you need is a Letter from Poppy Seed Projects and any of the following:
Modge Podge with scrapbook paper
Wrap with yarn,
or use vinyl and paint To create a unique Letter. 
Anyway you do it, make it your own.  Fun and Unique just like your family!Her are a few examples. Click onthe image for the instructions.
http://farm3.static.flickr.com/2718/4406572769_91eff47e73.jpg
I hope this little round up has sparked your creativity!!! Christmas is just around that corner.  Its never to early to get started.


Thank you Holly and Poppy Seed Projects for Sponsoring this post!

Monday, July 2, 2012

Firecracker Table Decor

Firecrackers are always a great way to decorate for the 4th.  Here is a fun tutorial to use for your table scape or mantel.


Friday, May 25, 2012

Rain{Bows} from My Sister's Suitcase

Happy Bloggy Birthday Adrienne!! Nat and Holly here from My Sister's Suitcase. Adrienne is a great friend and one of our very first blog followers! We are excited to be here to celebrate with her today. We're sharing a tutorial for one of our favorite EASY hairbows for the darling girls in your life...
The "mini" felt bow.
Aren't they cute?

Tuesday, May 22, 2012

Vintage {Button} Bracelet


Today's Post is brought to you by my Girlie Malinda.  She is a crafty Momma of 5 girls.  She loves to craft and try new things.  From the beginning we were a match. She is great to bounce ideas off of and make girlie things with. Enjoy this quick and easy tutorial.  She made this beautiful vintage button bracelet in under 30 minutes and for less than $10. 

Monday, May 21, 2012

Bloggy Birthday


Free Time Frolics is turning One and your invited.  The time has gone by so quickly.  It seems like just yesterday I started my little blog.  Each week it has been fun to work on something new to share with all of you.  So this week some of my bloggy buddies have stepped up and have some awesome tutorials in store for you this week. I am so excited for you to share my Birthday week with all of you. 

Let's Meet the Girls!

First up is One of my Girlfriends.  Malinda. She's a crafty Momma with 5 girls.  She guest posted last year at Home for the Holidays.  She loves to craft and her latest love is  jewelry.  Come back tomorrow to see what she has in  store for you!


Three crafty (and sometimes crazy) sisters chronicle their adventures in crafting. Whether its recycling an item that was headed for the trash, upcycling a product that had outlived its use, or creating a knockoff of an otherwise overpriced or outside-the-budget brand name, these sisters are always up for the challenge.

blushingbeauty3
I love to create new things for our home and my Etsy shop, Artistry By McKenzie G. I stay at home with my daughter, Harper learning new things everyday. I work once a month at a salon as a cosmetologist and I am so blessed to have that option.
I have a wild, out of control, exciting, crafty, overly organized life and I love to share it with others with my blog! Thanks for stopping by!

We are sisters and best friends, living 462 miles apart. We only get to see each other a few times a year, so in the meantime we share everything on our blog, My Sister’s Suitcase. We feature Home Decor, Printables, Upcycling, Kids Crafts, Seasonal projects, and more. We hope you’ll join us in our LDCR {long-distance crafting relationship}. Follow us on Facebook, Twitter, or Pinterest for more tutorials and original ideas!

These girlies are a- mazing!  So clever and crafty.  I love that I know these ladies and can be associated with there blogs.  They have some great tutorials this week to share with you.  Make sure to come back each day to what they created.

Now for the giveaway.  I have a great list of Items just for your winning pleasure!

1. Vintage Button Bracelet
2. Rain{bows} from My Sister's Suitcase
3. A few Crafties from my PYP stash.  Oh, there good too.  You will love them. Earrings, necklace and hairpins to name a few.
3. Photocraft Book from Those Crafty Sisters
4. A couple of scented lovelies from Scentsy.  My favorite smell, My Dear Watson!
5. $25 Gift card to FabricNest.com
6. $25 gift card to the store of your choice. Joanns, TJMaxx, Michaels, or Target.

Please follow the giveaway guidelines below and have fun. Please visit these blogs. These ladies have fantastic blogs, full of inspiration. They will not disappoint.
Related Posts Plugin for WordPress, Blogger...