Web Toolbar by Wibiya Free Time Frolics: Home Made Holidays
Showing posts with label Home Made Holidays. Show all posts

Wednesday, November 23, 2011

Traditions Link Party

Welcome to our Christmas Link Party.  Anything Christmas goes.  Link a project or 2.  Be sure to link back. Share with a few friends.  Maybe comment on a few.  We all LOVE comments. And enjoy. Check out our other  Home Made Holidays posts and giveaways. Entries close Saturday Night.
Every Linked Project is entered into our Big Giveaway.
Pick Your Plum is sponsoring our giveaway with a $50 secret box of Goodies.Christmas will come early!
I Love Pick Your Plum. Yummy Items for your Crafting Pleasure.
Here are a few items they have had in the past.

LOVE Pick Your plum!
Pick your plum {website to remember}
Love some Pick Your Plum
Just ordered these from Pick Your Plum; I can't wait to play with them.
They sell one craft item a day for half the price. Get them before your neighbor does.
Click on the link to the right to check out there site.
  So on to our link party.  Anything Christmas goes.  Link a project, a picture from an online photo site like Photo Bucket and have fun.  We will be choosing for our grand prize on Sunday November 28th with Random.org and Holly, Nat and I will be choosing our favorites to share and send you a little love in the mail.  Come back Monday Morning to see if its you.

Free Time Frolics

Monday, November 21, 2011

Home Made for the Holidays: Day 11: Stockings and Wrapping


Stockings have been a tradition for decades. And there are lots of theories about why we do it. Whatever your reason it is a loved tradition.

Stockings are so hard sometimes. I like to have fun sensible things in my kiddos stockings. Some are traditions that I have had since Iwas a kid others are new things we have added as our family has grown.
Here is a list of things I like to use.


1. Pudding snack: I like to use this because if you open presents one at a time like I did as a kid you get really hungry. At one time for a few years there were 10 of us. We had a yours, mine and ours family. Christmas morning went on for hours. Pudding taste good and it give your your milk. LOL. I guess.
Pudding Cups, Vanilla

2. Orange or Raspberry chocolate sticks. By Sweets Candy. I love these things. They usually cost about $3 and fill the stocking. For as long as I can remember I have gotten these little beauties for Christmas. Now as a mom I do the same for my kids. They love them too. On a side note: If you live in Salt Lake City you can go on a tour of the Sweets candy factory located in West Valley. You can buy these yummy treats in Bulk and other treats. ie. Chocolate covered Cinnamon Bears. If you haven't had one, You must try. They are delightful.

3. Gift cards: My boys are hitting the age that they want a choice in the things they want. This year its the app store.


4. Dollar Store items: I like cheap easy toys, that I don't care if I throw them away a month later. Walmart has a selection of $1 toys and activities. That prove to be pretty goods and the kids enjoy them. 

5. Electric Tooth Brushes: I love to buy electric tooth brushes for Christmas. My kids love them but sometimes they can be a bit pricey. So for Christmas I splurge a little bit. My kids like getting them because they are electric and usually there favorite super hero or character and they get a new toothbrush that makes mom happy. All is good in the world.

6. Head phones: I like the idea of head phones. They are small. Can be inexpensive if you want. And when there video game of MP3 player is to loud. They have there very own pair of headphones to use.

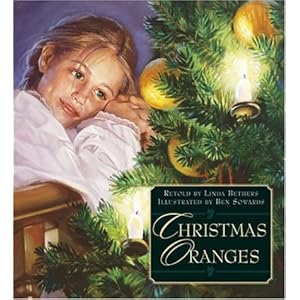
7. Oranges. Every year for Christmas I woke up to an orange in the toe of my stocking. Another yummy treat to eat when opening gifts. These also go great as a gift to a neighbor or to kids given along with the book the Christmas Orange. It was written by a lady I knew as a child. A very sweet story.
Christmas Oranges


Here are a few more links to other stocking options.  Lots of things to choose from.  I hope your holiday season is filled with family, friends, good food and lots of lovign memories!

For Wrapping those beautiful gifts head on over to:
My Sister's Suitcase
for some fantastic ideas and a giveaway.
Don't forget our other giveaways.  Here is the List.

Don't forget to come back tomorrow for our Family tradions link party.  We have a fantastic prize to one lucky winner.  A  gift pack from Pick Your Plum. A suprise box your going to love!
Be sure to come back and bring a few friends with you!


Wednesday, November 16, 2011

Home Made for the Holiday {Grand parents}

I have this Wonderful, Crafty Neighbor.  She is amazing.  She doesn't have a blog to follow cuz she is busy teaching her 5 girls how to craft, cook and sew. And let me tell you, those girls (the older ones of course) craft, sew and cook just like there Momma. Amazing!!! I don't know how she does it.  
So I asked my friend if she would be willing to help me out with our Hand Made for the Holidays.
(secretly I really needed this tutorial so I can make one of my own)

She has been making these for a bit and I just love them.  Each one has its own personality and a little something special about it.  Any Granny would be Tickeled Pink to have this beauty to wear.  So here you go.. Click on the link and it will take you to a Google doc with step by step to make your own.


Today's Tutorial is brought to you by Pick Your Plum. (If you want to check our Pick your Plum click on the link on the right.)  I love this company.  Awesome crafts supplies at half the price. They do an item a day for great prices.  I love getting up in the morning (7am MST) and seeing what's new. I am kind of an addict.  For 2 reasons: 
 1. I am a craft addict.  If I see something that is cute, easy, and my style I will buy it.  
2.  There prices are so good. I can't pass the up.  I love making crafts for a bargain.  

I have several Projects I have made with Pick Your Plum items and some just waiting to be used (Mostly cuz I loved the item and didn't have a purpose. Yet... But the price was so good!)

One of the items are these beautiful charms used in today's post. Here are a few others.
Hair Clips

Earrings

Vinyl
Chalkboard and Dry Erase Vinyl

I also have a  nice box  full of goodies I am still trying to decide what to do with.
(It was a Saturday special grab bag.  It was like getting an early Christmas. Yipee for me!)


Today's Giveaway is something special.  A little bit of everything. 
You get a set of 4 frames from this post.
2 pairs of paintable earrings
and
10 of the hair clips (shown above) to make your own creations.
To win this You have 3 chances:

1. Become a fan of Pick Your Plum on Facebook.

2. Sign up for there daily newsletter.

3. Become Follower or "Like" Freetime Frolics on FB. 

Easy. 3 chances to win.
Please leave a comment for each entry. Entries close on 26th. 

Home Made Holidays {Grandparents 2}

I decide that Even though the Necklaces are beautiful.  Grandpas are probably not that interested.  So I came up with this little beauty for him. 
I found these little frames at Michael's in the dollar section.
They started out looking like this. 

Not to bad.  The colors were simple and nice for Christmas.  But I need a little more flair so I did this.
Add  a little paint and a magnet on the back, a couple of Grandpas favorite kids and voila. A fun easy little gift Gramps will love.

Keep them on the fridge or these could also be great for an office space for any guy.


Check out today's give away on this post. 
It includes a set of these frames and a few more things.
  Don't for get to leave a comment to get entered.

Adrienne

Tuesday, November 15, 2011

Home Made For the Holidays {Gifts for Dads}

Todays post is brought to you by My Sister's Suitcase.  Be sure to head on over to see a gift for dad. A super sute idea to get dad in the mood for the holidays.


Want to see what is going on?  Are you following our giveaways?  Here is a link to keep better track.
Come back tomorrow or a fantastic post..  Gifts for grandparents. 
See you tomorrow.

Adrienne

Monday, November 14, 2011

Home Made Holidays {All about the Ladies}


Today is all about he ladies.  Moms, Girlfriends, Grandmas, Daughters any lucky lady in your life. I have made a few ideas I think you may like.  Whatever kinda of girl she is one of these ideas is bound to get her excited. So off we go....


Home Made for the Holiday Day 6 For the Ladies


I was at a craft show and a local vendor was selling jeans and jewelry.  All was manufactured.  When you bought a pair of jeans you got to choose a piece of jewelry.  I found a necklace I loved and she ended up getting it with her purchase.  I decided to recreate it with a little twist.  Here is what I cam up with. 

Thursday, November 10, 2011

Home Made for the Holidays: day 4 Cute Pillow and Printable

Naughty Or Nice Free Printable
I made one of these a few years ago to help my kiddos behave a little better around the holidays.  Those kiddos have kinda outgrown the chart.  But my 3 year old has not so I decided it was time to introduce the Naughty or Nice Chart this year to here. 
Print it out and hang it on a fridge or magnet board.  Use a small magnet to track the goodness and let the magic of the holidays do its work. 
There are no set rules just do what works best for you.  I decided to let my daughter move the magnet each day she has done something good. But when she make a poor choice we move it back. No matter how many times a day. We shall see if it works.  So here it is.

The Naughty or Nice Chart


PLEASE follow the following rules for Free Time Frolics printables:
  • I would love for you to become a follower of Free Time Frolics. More Free Printables are coming. You don't want to miss out.
  • Free Time Frolics printables are for PERSONAL USE only. You may not re-sell, re-distribute, or claim them as your own.
  • If posting on the internet, you MUST post a link back to the original post or this page.
  • Freebie printables are offered "as is" unless otherwise noted.
  • Pin, share, use in your home or as a gift. Enjoy.
Just right click the image. Save to your hard drive and print wherever you would like.
Image is made to be 8X10.


Home Made day 4Tutorial  is over at My Sisters Suitcase today.  Check out her post for a kids Christmas pillow and a giveaway. Its super cute you won't want to miss it.


Linking up too:

 
Junk In Their Trunk

Wednesday, November 9, 2011

Home Made for the Holidays for the Girl


Home Made for the girl... I saw a dress liked this on pinterest and just couldn't pay the price. So with my mad sewing skills I came up with this. 


Supplies:
Fabric 2 different prints
1 inch elastic for waist band
matching thread
ribbon about 3 yards
embellishements
about  1/2 yard scrap fabric or just white fabric

I made my skirt to be a size 4-5
You will need to cut 3 pieces.
Waistband (24x45)
Skirt body (15x45)
Skirt top (12x45)
I decided I wish I would have made the top 15x45 as well to get more gather when finished.

Take your waist band and sew the short ends together.  Making a a band.
Make a 1 1/4 inch hem. Leave a 1 inch opening for threading elastic through later.


Take the skirt body and sew the short ends. To make a a tube. Hem the bottom with a 1/4 inch rolled hem. Set your skirt body and waist band.


Cut 2 inch strips.  For a 15 length skirt I cut 5.

  I ran the raw edges through my serger just to clean the edges.
Hem 1 short edge. This will lay with the hemmed edge of the top skirt.

Take the top skirt and hem the bottom edge.Your fabric should be one length.
Measure the fabric into sections For 45 inches I measured mine 8 1/2 inches. Lay one of your strips down and pin.


Stitch down each edge of the strips. Then down the center. Dividing the strips into 2 sections.
Fold fabric with right sides together.


Stitch down along the edge. Leaving about 3/4 inches from edge to seam.

Press open seam. Stitch down, Making a pocket wide enough for your ribbon.
Looking something like this when you are finished.

Turn  skirt body right side out.
 Now is when you thread your ribbon into the pockets you just made.
Stitch around the top to secure the ribbons in place. 


Pin both fabrics together.  Using a basting stitch around the the top of the skirt. About 1 inch from the top. Pull the top thread and gather the skirt until the skirt fits the waistband.


Once the skirt is gathered and fits the waist band. Pin the two together.

Sew the waistband to the skirt.


Thread the elastic into the waistband. Stitch the elastic together and close the waistband.

All finished.  Just pull your ribbons and gather the top skirt.

Perfect for  little girls who love to jump and twirl.


Thanks for joining me for Home Made Holidays.  Don't forget to come back tomorrow for a fun Kid craft. 

Tuesday, November 8, 2011

Home Made for the Holidays For the Boys

For Christmas this year I wanted to try something a little more traditional for clothing.  Since my baby is so little I decided that this year he would have a bow tie to match his sisters skirt.  He is to little to complain.  I love how it turned out.  A little guy in a bow tie is my favorite.
Day Two

I love Christmas time.  So many exciting things just waiting to happen.Yummy Food, Christmas shopping, parties and so much more.  This little tutorial will help dress that little man of yours (or big boy) for an
special occasion. Holiday Bow tie!


You will need:
1 fat quarter
3 inches of hook and loop tape
thread.
I used the template from Martha Stewart  bow tie tutorial.  (Here)
I says to enlarge 200% I only enlarged mine by 175% for my little guy.  200% is a little to big
 for kiddos under 6.
I also added about an inch to the length of the pattern piece.  Since I am not sewing the two tie parts together, I need a little extra on the ends to add the hook and loop tape.

Fold fabric so that your fabric is 4 thick.
Lay your pattern piece on the fabric and pin. 
 If you are going to fussy cut fold your fabric in half and place your pattern piece where you want it. 


Once you have your piece pinned where you want it cut out your bow tie.


Separate your tie pieces.  Place two pieces right sides together. Pin.


Stitch along the outside edge of the tie piece.  I use the edge of my presser foot as a guide. Do this for both pieces.  Clip the edges of you bow tie.


Turn you tie pieces right sides out.  Use a small stick or tip or your scissors to push corners out.  Press.


turn raw edges to inside of tie for a clean edge. Press. Cut a 3 inch piece of hook and loop tape. Lay the hook and loop on to the edge of the tie piece. Pin and stitch around the edges of the hook and loop tape.
Your tie is done. Its time to tie it.  I looked at several tutorials for tying a bow tie. I found that a video was the best tutorial.  You can find more on U Tube or the Martha Stewart site (Here)


Here is the result.  Its a little big for my little man but oh so cute!
Just in time for Christmas.


Making your own bow tie is easy.  For today's give-a-way I will be giving away my tie pattern with 
4 extra clips.  Not a seamstress.  I will make one for you.  Bow tie or adjustable neck tie.  You pick.  I have lots of choices.


Related Posts Plugin for WordPress, Blogger...