Web Toolbar by Wibiya Free Time Frolics

Tuesday, October 2, 2012

Please Welcome {My Sister's Suitcase}

Hello Masquerade Ball guests! We're Nat and Holly from My Sister's Suitcase, and we are so excited to be judges for Adrienne's costume contest. Today we are sharing an easy way to get a custom look for your little girl's Halloween costume this year... by making a fun hair accessory!

Last year, I made several Disney-themed tutu dresses to sell at a local boutique. Some of my inspiration was found on Pinterest, but there were a few looks that I came up with all on my own!

Here are two of my favorite costumes:

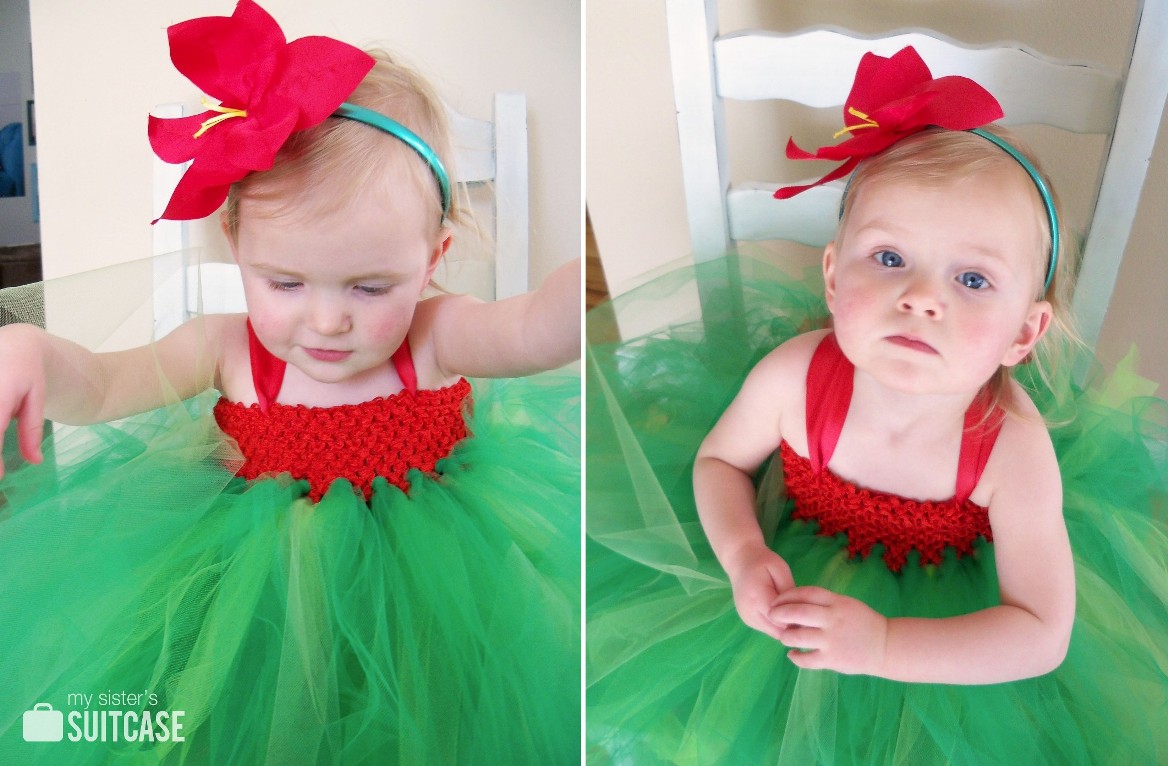
I made an Ariel {Little Mermaid} dress for my daughter, and a Lilo {from Lilo & Stitch} dress for a client of mine. (Suzanne is a photographer and bought several of my tutu dresses to use for photo shoots.) 
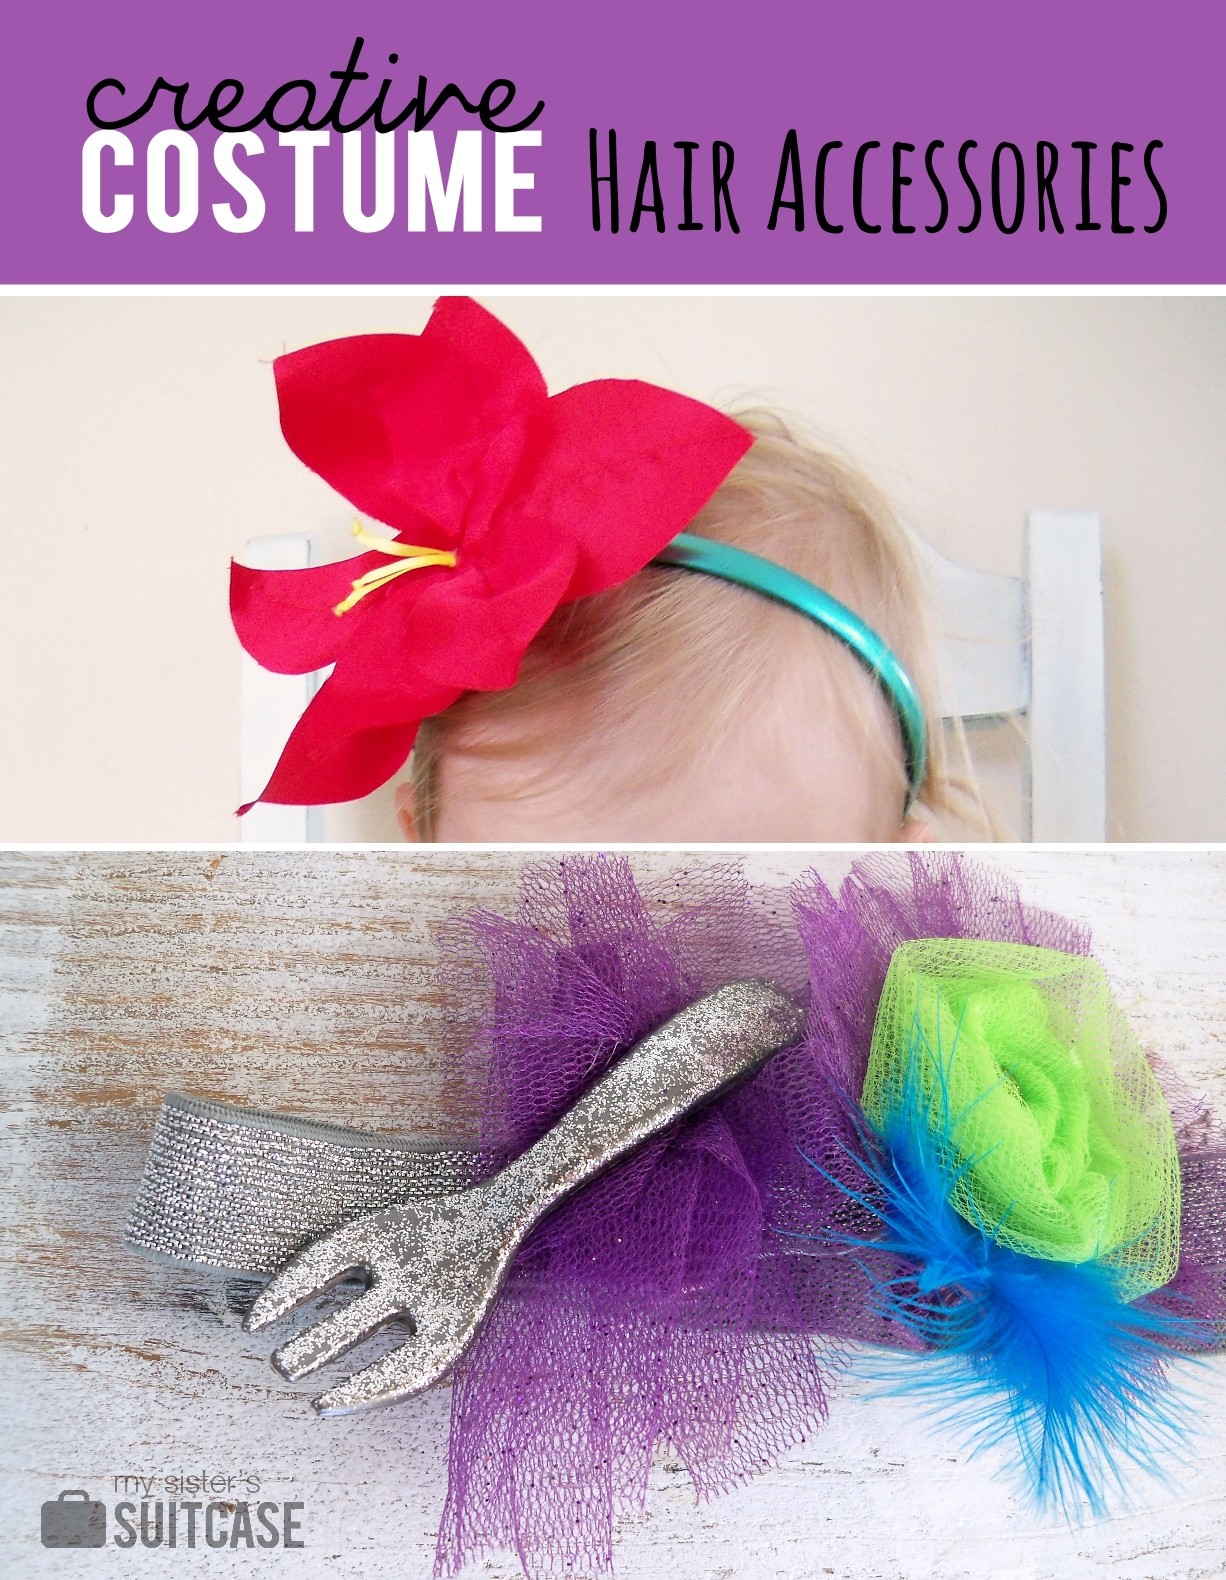
When I am coming up with ideas for my designs, my favorite part is thinking about how I can make a fabulous hair accessory to put the dress "over the top!" For the Lilo costume, I wanted to create an over-sized red hibiscus flower to add a little drama to the outfit.
I used some red satin-type fabric, yellow satin ribbon, and a headband from the dollar store. To create the flower, I cut seven petal shapes out of the red fabric and stitched a seam down the middle of each petal. I added three small pieces of ribbon {with the ends knotted} to make it look like the stamen in the middle of the flower! I carefully glued all the petals together in the center, with the ribbons coming out of the middle. The flower was attached to a red felt circle and slid on to the headband. That way you can adjust the placement of the flower depending who is wearing it! I love how it turned out:
For my Little Mermaid costume, of course I had to incorporate a Dinglehopper!
I found one of my little girl's play kitchen forks, spray painted it silver and added a layer of glitter paint on top. I added some purple tulle underneath {to match the dress} and glued it together. I had a separate clip for the dinglehopper, so you could choose either that, the flower, or BOTH!
If you are looking for a way to spice up a store-bought costume this year, or customize your own costume, a homemade hair accessory is the perfect solution!
Thanks for having us today Adrienne! We can't wait to see all of the homemade creations you guys come up with :)

Thanks Nat and Holly. I am in love with the "Dinglehopper". If you haven't been over to see them you need to.  There blog is full of wonderful projects.   Head on over and check them out.


This post is sponsored by:
Photobucket

Monday, October 1, 2012

Spider Hair Clips

That time a year is rolling in.  A month where you can get away with a little more than the norm.  I love Halloween and the fun things my kiddos get to experiment with.  They just get to be kids and have fun. 
I love experimenting with my Little girls hair.  (Frankly I am not very good a t little girl hair.  Probably why I only have one girl}   I am more of a pony tail mom! 
This year I wanted to make something different for her hair.  The usual bows are great, but I wanted off the beaten path kind of thing.  So I came up with these.  Big black fuzzy spiders for here hair!


Want to make a few of your own? Here is how you do it!
Supplies:
Black pom poms
Wood skewers
Googly eyes
Black ribbon
1/8 inch ribbon for bows
Hair clips
Hot glue

Start by wrapping ribbon onto a skewer tape off the ends. Depending on how many you are making you will need 1-2 skewers of ribbon for your legs.  Place on cookie sheet in an oven on the lowest setting. Bake for 20 minutes. This is the same method you use for making Corker hair bows.

While your ribbon is baking start by wrapping your hair clips with black ribbon

Add 2 googly eyes to your black pom pom. Set aside.

When your ribbon is ready unwrap from the skewers. They should be like a curly corkscrew.

Mine were really long and I was able to get one spider from 1 wrapped skewer. I folded the ribbon in half and then in half a gain. This gave me eight legs. Glue legs to the center of the clip.  Wrap a small piece of ribbon around the curly ribbon and the clip to hold secure.
Add a bit of glue to the top of the legs and add the pom pom.  Add a cute bow and your are ready to go.

You could even use them to decorate a shelf or a mantel.

Have a Spooky Month!! And don't forget to enter the Masquerade Ball.  The Link party has begun.  Please stop by and add your handmade Halloween costume.  I would love to see what you have made!

Have a Spooky Month!! And don't forget to enter the Masquerade Ball.  The Link party has begun.  Please stop by and add your handmade Halloween costume.  I would love to see what you have made!


Free Time Frolics

I Heart Nap Time

Friday, September 28, 2012

Masquerade Ball Link Party

Yeah!! The Masquerade Ball is finally here! I am so excited to see what you have made this year.  Before we get started let's take a look at how the Ball will work!


This competition is all about creativity and your mad skills. Everyone loves a homemade costume.  Show your best and create something great. 

--Enter up to 2 costumes, new or old. It must be made by YOU. It does not have have to be your original idea or tutorial, and it doesn't matter if it was made with or without a pattern.  

-- Costumes do not have to be sewn.  They can be made of any materials you can find.

--FAMILY FRIENDLY costumes only.

-Costume must be 50% handmade. You may buy supplies or reuse old items to make your costume but the bulk must be produced via your handy work. Example: you are going to make a cowboy.  You buy or reuse jeans, t shirt and hat. You make the accessories. vest, chaps, holster, bandana and boot covers

--Entries will be accepted September 26th- October 21st in the form of a link party. 

For all the Masquerade Ball Rules Please see this Post. Here

--To enter, you must be a follower of Free Time Frolics  via Facebook and RSS.
--If you have a blog, please post the "I'm attending the Masquerade Ball" button on your sidebar and blog post!
Free Time Frolics
<div align="center"><a href="http://www.freetimefrolics.com/2012/09/masquerade-ball-link-party.html" title="Free Time Frolics"><img src="http://i850.photobucket.com/albums/ab68/cosettescloset/attending150.jpg" " alt="Free Time Frolics" style="border:none;" /></a></div>

Here are your Fantastic Judges!


Here are  list of the Prizes!  The Sponsors have been so generous! I am so grateful for their willingness to support the Masquerade Ball for it's first year! A Big Thanks to all of them!!!

First Prize


 Second Prize


Third Prize
So are you ready??? I am so excited to see what you have made!  Please be sure to share this post with your friends and family.

Please be sure to follow Free Time Frolics to stay up on what is happening, features and the winner of this year's Masquerade Ball winner!

Thursday, September 27, 2012

Please Welcome {Uncommon Designs}

Hi everyone!  We are Bonnie and Trish, sisters-in-law and the creators behind the craft blog, Uncommon Designs.  We are so excited to be on Free Time Frolics today as part of the Masquerade Ball!
BOO yarn letters tutorial
Did you how much we love yarn...yep yarn! Now, neither of us knit or crochet but we sure do love to use yarn in other ways. We created these adorable "BOO" yarn letters with the help of a great tutorial by Let Birdz Fly and our inspiration was an incredible display over at  Eighteen 25.
We used smaller letters and instead of a cute little spider {Bonnie hates them has a mild phobia issue} hanging down, we made little, sparkly black bats "flying" off the letters!!
BOO yarn letters tutorial
We simply spray painted wooden bats black. Then after applying a layer of glitter glue, we sprinkled very fine black glitter all over them! {The photo just does not do them justice..really!} We twisted floral wire, which we also spray painted black, around a pencil {see my cute son's "I Love Math" pencil there!} and pulled it out just a bit. Finally, we glued the wire to the back of the bat with our handy-dandy glue gun! {seriously, what did we do before them!!??}
BOO yarn letters tutorial
  
Here is our sweet little "B" before the flying bats, it is fabulous as is...but...
BOO yarn letters tutorial
Doesn't it look adorable with the bats?
Bonnie and Trish
Thanks so much Adrienne for having us here today! We would love for you to stop by Uncommon and say hello! You can also find us on FacebookTwitter, and Google+ !  

 Join us each Wednesday for our "Uncommonly Yours" link party!

Thanks so much Bonnie and Trish!  I just love there site and those BOO letters are to die for!  For more great tutorials head over and visit and be sure to be a follower.  
For the Masquerade Ball giveaway click Here!
This post is Sponsored by:
Related Posts Plugin for WordPress, Blogger...