Here to help kick of the week is Megan from Brassy Apple. She is amazing. I love this amazing costume she made for her daughter. To see more of Megan check out here blog. Brassy Apple was one of the first blogs I ever followed and read. I kind of have a crush on her. I recently got to meet her and I love even more now! If that is even possible...
Hello hello! It's Megan of
Brassy Apple! Super excited to be able to share my DIY Halloween Costume with you! Want to find more from me?.....Check out my links at the bottom of this tutorial!
Enjoy!!
supplies:
2 pieces of foam core board
cutting tool - exacto knife/box cutter, etc
fabric(s)
spray adhesive
tape
fabric marker (optional)
yard stick (optional)
pencil
elastic?
hotglue
(Depending on how tall your daughter is will determine if you need 2 pieces of foam core or 1)
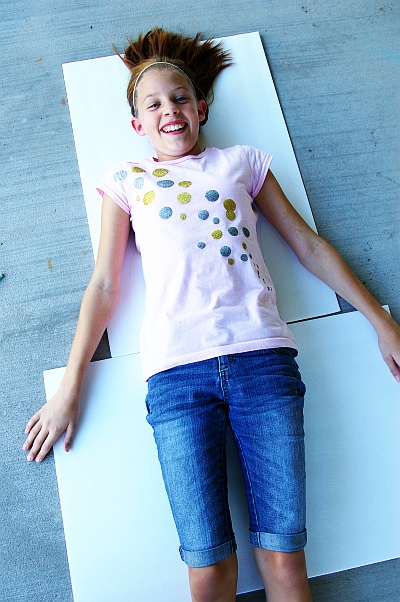
Step 1: Place the 2 pieces of foam core together on the ground/floor. Have your daughter lay on the boards. I lined up her waist with the bottom of the first piece so I could cut a top out). Don't trace around her arms. Just her shoulders and sides and down along her hips. You don't have to press hard with the pencil. This will give you an idea of where to draw the outfit and how wide to fit her.


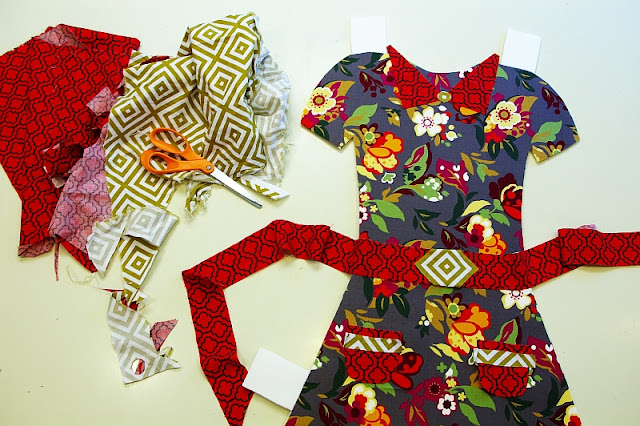
Step 2: DRAW the outfit! Give yourself a general outfit to follow and cut out. This part is all up to you! Puffy sleeves, no sleeve, blouse-y look, tailored, etc. Remember to add the TABS to give it the paper doll look! You will need two TABS for the shoulders and a few around the bottom part of the outfit too. I used a folded post it note to trace so my TABS were all the same size. (It might be helpful to tape the 2 pieces together a bit to make the outfit a smooth transition) I also used my yardstick to make some nice straight lines for the skirt. TIP: straight lines are easier to cut than curvey ones.
Step 3: Cut it out. Remember the lines you drew will be covered up by fabric! My box cutter cut very smoothly and easily through the boards.
Step 4: Tape/Secure the two pieces together so the two pieces are more stiff and connected as 1 piece.
Step 5: Pick your fabrics! Mix it up - keep it solid. Whatever you fancy is - go for it! Lay your fabric right side down and turn your foam board over. Trace and cut with scissors! A fabric marker is helpful to trace on the fabric. Once it's cut, place it on the foam core again to make sure it's a good fit. Trim as necessary.
Step 6: GLUE! Follow the directions on the bottle of spray adhesive to apply your fabric. Let dry.
Step 7: Embellish! It's fun to add layers for a more polished look. Just remember to add in FLAT layers - not dimensional. If necessary - photocopy buttons, trim, etc to add to your outfit. If you add a belt to the outfit cut it extra long so it can be wrapped around your daughter as a way to help hold the costume on. Or attach some fabric or trim to the inside middle of the outfit as a "belt".
Step 8: Using hot glue you can attach 2 loops of elastic near the shoulder area. Use your daughter as a measure of where they should be placed and how large. These loops will make the costume easy to slip on and comfortable to wear. Don't make the loops too big that the costume sags (the belt in the middle is a good back up to keep the costume in it's place). TIP: we found we didn't need elastic loops so try the belt option first and see if it works!
DONE!!! You can create a hair accessory in paper doll style as well to match your outfit if you'd like! Don't forget the TAB. It could easily be attached to a headband to wear! Finish off the outfit with leggings, tights, shoes etc!
TIP: don't make it too long because it can be a bit hard to walk in with the stiff foam board hitting your daughters knees....lesson learned!
We don't want any trick or treaters falling over or having a hard time!
----------
I hoped you enjoyed my tutorial! - Megan
Connect with me to find out more!
and my weekly
Refashion Web TV show!
Thanks Megan and your adorable Brassy Blossom. I love your tutorial. For more costume and Halloween Ideas please come back tomorrow! Don't forget to enter the Masquerade Ball
giveaway.
This post is Sponsored by:


