Web Toolbar by Wibiya Free Time Frolics: Home decor
Showing posts with label Home decor. Show all posts

Friday, October 5, 2012

Itsy Bitsy Spider Door Decor


This year for Halloween I wanted a little something different for my front door.  There are some many cute wreaths out there.  I love them all.  I was wanting something a little more non traditional. I found my idea at the Dollar store.

 Here is what you need:
2 googly eyes
spool 3/8 inch black ribbon
Foam pumpkin
Spider web
Hot Glue
Dowel or skewer

Start by wrapping your ribbon on to a skewer or dowel like in this post: Here {Spider Hair Clips}
 After baking your ribbon cut into 8 equal parts.

Take a skewer and punch a hole into the pumpkin.  Use the skewer to push the ribbon inside.  Use a bit of hot glue to secure the ribbon into place.


Add your googly eyes. 
Depending on how long you want your spider to hang, cut your ribbon accordingly.
Use the skewer to punch the ribbon through.  Dab some glue to the hole and ribbon to secure. 

 Your spider is ready to hang.

Add your Spider web and your new spider has a home!

I added mine to my front door.  Not quite your traditional door decor.  But sometimes I am not so traditional!


Don't forget the Masquerade Ball is up and going.  Stop by and link up your favorite Handmade Halloween Costumes. Some serious prizes are up for grabs.  Will one go to you???
Free Time Frolics
Visit thecsiproject.com

Thursday, October 4, 2012

Please Welcome {52 Mantels}

Today I have a fun painting technique to show you as well as an easy Painted Halloween Sign! I'm so glad that Adrienne invited me over to participate in the Masquerade Ball. I love the fun costumes of Halloween and I can't WAIT to get inspired by you all! 


Painted Halloween Sign {using a charcoal transfer method!}

supplies:
unfinished wooden plaque
mod podge
paint brush
charcoal pencil
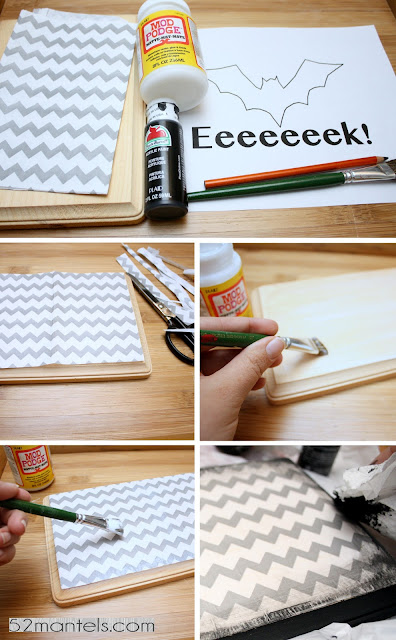
decorative paper (I used a chevron treat bag because I liked the pattern!)
an image to trace (I used this bat and added words. But, you could use any image you can print on plain printer paper!)
paint (I used black acrylic)


After gathering supplies, cut your paper to fit the plaque's face. Attach the decorative paper to the wood by painting mod podge under and on top of the paper. After the mod podge dries, take a cloth or paper towel and "paint" the plaque's sides with black paint. You could do this with a brush, if you'd rather. I wanted a rough, distressed look, so I dry-rubbed the paint on the sides with my paper towel, letting some come over onto the paper.  


To transfer your image onto your dry plaque, rub charcoal over the entire backside of your image. Place the image, charcoal side down, onto your plaque. Take a pen, pencil or sharp object and trace around the entire image. For the letters, trace around the edges. When you lift the paper, the design will be outlined in charcoal. So cool! 


After your design is traced onto your plaque, take a small paintbrush and paint inside the lines. After my plaque was done, I painted on small, flying bats to add a bit more.

Wah-la! You have a hand-painted Halloween Sign! Now that you know this technique, you can use it for all KINDS of things! Get creative! 


You can find Emily at 52 Mantels a blog about all things home, including weekly mantel makeoversseasonal craftseasy recipes and simple DIY projects. Come over for a visit! 

                                         52 Mantels
52 Mantels
52 Mantels
52 Mantels
52 Mantels

A Big Thanks to Emily for Posting today.  What a fun project to do.  I may even have my older boys try that out!  Please head over to 52 Mantels and check it out.  So many great ideas!!! The Masquerade Ball Link Party is up and running. Se sure to add your Handmade Costumes!

This post was sponsored by:

Sunday, September 16, 2012

Reusable Pumpkin and other characters


Today's post is one I did for Eighteen 25 and there Spooktacular September.  Enjoy!


Do you ever buy those huge containers of food at Sam's Club or Costco?  Your kids eat the entire container and then you think, can use this for something or is it going to take up all the space in my garbage can.  Well today you can say I have a project for that big old container. Today I am going to show you how to reuse those empty containers into fun decor!

I started with an old cheese ball container.  You know the ones they sell at Sam's club, that your kids just love. Yeah those ones!
Let your kids eat those till they turn orange. Just think they could be Jack-o-lanterns for Halloween! Or you could use them as a treat for school or a party.
Clean out your container and remove the label from the front. If you get the label wet with hot water they will usually peel right off.  Make sure all the glue is off the container.  If not you could use a little adhesive remover (goof off)  to get it off.
Next paint your container.  I used Valspar copper colored paint for the container and green paint for the lid. Give it a good coat. Let dry.  Add one more coat.  Let dry.


While the paint is drying get your vinyl. You can buy vinyl for lots of places.  Joanns and Michaels carry a few colors.  I purchase mine at Vinyl Expressions.  The price is great and there shipping is lighting fast. Use the template here or create your own. Draw your face onto the back of your vinyl. Cut, Peel and stick.


You can add leaves or ribbon to the lid. Then use them to decorate your porch, tables or to put your Trick or Treat candy in.


Wednesday, August 1, 2012

Kitchen Makeover

Welcome to my Kitchen Makeover. We purchased our home a couple of years ago.  I looked at so may homes and fell in love with it the first time I saw it.  It took a little convincing for my husband, but I did it.  The home was in foreclosure.  Our relator told us the home has great bones but needs some work.  I walked in and could picture it as my home.  Lucky for my I could see past the flaws.  A large mudroom and pantry are my favorite features.  I had dreamed about my mudroom. Lockers for each child, fold out ironing board and wash basin.  I love it.  My kitchen on the other had is nice but way to much wood for me with 4 different stains or paint in one room. Some of the features I love are under and over the cabinet lighting. We have lights that can be turned on that are above and below the wall cabinets.  It makes it hard to decorate above the cabinets but that means less dust bunnies for me to find. Here is what it looks like.
kitchen1kitchen
I started with the bead board backsplash. 
I chose a hexagon subway tile. I found it at Lowes.   The style is the same but my tiles were all white.  Then every now and then I would cut out a small square tile ands replace it with a colored glass tile.
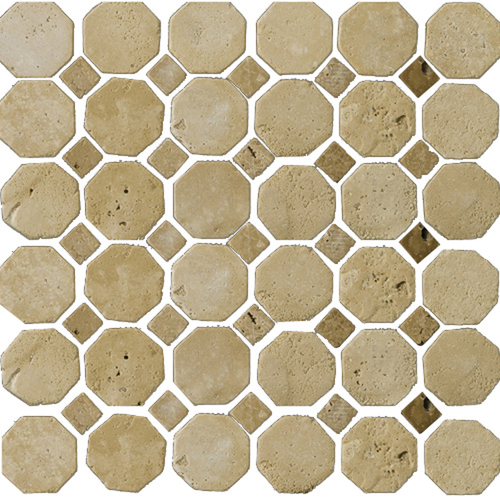
Zoomed: Emser 12" x 12" Octagon Beige/Mocha Travertine Tile

Here is the kitchen with just the tile done.
kitchen2
Already a huge difference. Almost enough to stop there but I needed a little color. So I painted my Island. My front room is in Dark Turquoise (I{heart} Turquoise) and Burnt Orange.  So I painted my Island the same color as the wall above my fireplace to help tie the 2 rooms together.

I love th Bright pop of color it askitchen3
I love the pop of color is brings to my kitchen.  It is amazing what a little paint can do!
The last phase of my kitchen make over was the ceiling.  Did you see the wood slat ceiling.  I love the wood slats but the honey color was not my cup of tea.  I thought that white paint would help brighten up the room.  I also had 3 pendant lights.  2 were broken.  They also broke your line of vision when looking into the kitchen.
So I painted the ceiling white. Took the Pendant lights down and replaced it with a ceiling light box that matched the bead board oven hood.
Here is my finished product.
kitchen
So there is my kitchen.  Maybe it will inspire you to create something great. 


52 MantelsVisit thecsiproject.com
Related Posts Plugin for WordPress, Blogger...