Web Toolbar by Wibiya Free Time Frolics

Wednesday, November 9, 2011

Home Made for the Holidays for the Girl


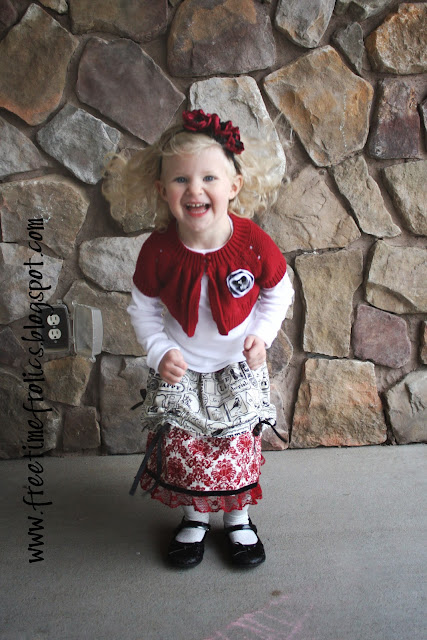
Home Made for the girl... I saw a dress liked this on pinterest and just couldn't pay the price. So with my mad sewing skills I came up with this. 


Supplies:
Fabric 2 different prints
1 inch elastic for waist band
matching thread
ribbon about 3 yards
embellishements
about  1/2 yard scrap fabric or just white fabric

I made my skirt to be a size 4-5
You will need to cut 3 pieces.
Waistband (24x45)
Skirt body (15x45)
Skirt top (12x45)
I decided I wish I would have made the top 15x45 as well to get more gather when finished.

Take your waist band and sew the short ends together.  Making a a band.
Make a 1 1/4 inch hem. Leave a 1 inch opening for threading elastic through later.


Take the skirt body and sew the short ends. To make a a tube. Hem the bottom with a 1/4 inch rolled hem. Set your skirt body and waist band.


Cut 2 inch strips.  For a 15 length skirt I cut 5.

  I ran the raw edges through my serger just to clean the edges.
Hem 1 short edge. This will lay with the hemmed edge of the top skirt.

Take the top skirt and hem the bottom edge.Your fabric should be one length.
Measure the fabric into sections For 45 inches I measured mine 8 1/2 inches. Lay one of your strips down and pin.


Stitch down each edge of the strips. Then down the center. Dividing the strips into 2 sections.
Fold fabric with right sides together.


Stitch down along the edge. Leaving about 3/4 inches from edge to seam.

Press open seam. Stitch down, Making a pocket wide enough for your ribbon.
Looking something like this when you are finished.

Turn  skirt body right side out.
 Now is when you thread your ribbon into the pockets you just made.
Stitch around the top to secure the ribbons in place. 


Pin both fabrics together.  Using a basting stitch around the the top of the skirt. About 1 inch from the top. Pull the top thread and gather the skirt until the skirt fits the waistband.


Once the skirt is gathered and fits the waist band. Pin the two together.

Sew the waistband to the skirt.


Thread the elastic into the waistband. Stitch the elastic together and close the waistband.

All finished.  Just pull your ribbons and gather the top skirt.

Perfect for  little girls who love to jump and twirl.


Thanks for joining me for Home Made Holidays.  Don't forget to come back tomorrow for a fun Kid craft. 

Tuesday, November 8, 2011

Home Made for the Holidays For the Boys

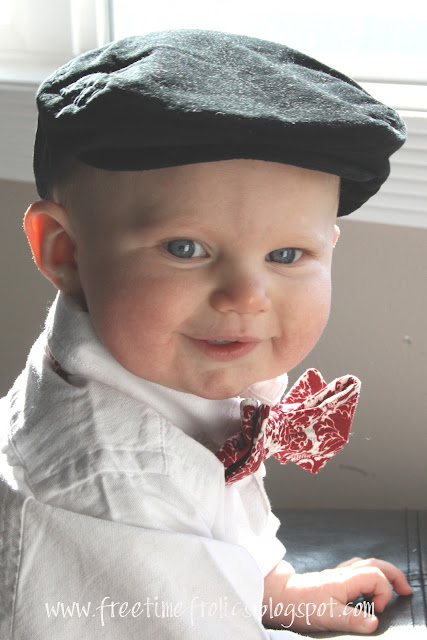
For Christmas this year I wanted to try something a little more traditional for clothing.  Since my baby is so little I decided that this year he would have a bow tie to match his sisters skirt.  He is to little to complain.  I love how it turned out.  A little guy in a bow tie is my favorite.
Day Two

I love Christmas time.  So many exciting things just waiting to happen.Yummy Food, Christmas shopping, parties and so much more.  This little tutorial will help dress that little man of yours (or big boy) for an
special occasion. Holiday Bow tie!


You will need:
1 fat quarter
3 inches of hook and loop tape
thread.
I used the template from Martha Stewart  bow tie tutorial.  (Here)
I says to enlarge 200% I only enlarged mine by 175% for my little guy.  200% is a little to big
 for kiddos under 6.
I also added about an inch to the length of the pattern piece.  Since I am not sewing the two tie parts together, I need a little extra on the ends to add the hook and loop tape.

Fold fabric so that your fabric is 4 thick.
Lay your pattern piece on the fabric and pin. 
 If you are going to fussy cut fold your fabric in half and place your pattern piece where you want it. 


Once you have your piece pinned where you want it cut out your bow tie.


Separate your tie pieces.  Place two pieces right sides together. Pin.


Stitch along the outside edge of the tie piece.  I use the edge of my presser foot as a guide. Do this for both pieces.  Clip the edges of you bow tie.


Turn you tie pieces right sides out.  Use a small stick or tip or your scissors to push corners out.  Press.


turn raw edges to inside of tie for a clean edge. Press. Cut a 3 inch piece of hook and loop tape. Lay the hook and loop on to the edge of the tie piece. Pin and stitch around the edges of the hook and loop tape.
Your tie is done. Its time to tie it.  I looked at several tutorials for tying a bow tie. I found that a video was the best tutorial.  You can find more on U Tube or the Martha Stewart site (Here)


Here is the result.  Its a little big for my little man but oh so cute!
Just in time for Christmas.


Making your own bow tie is easy.  For today's give-a-way I will be giving away my tie pattern with 
4 extra clips.  Not a seamstress.  I will make one for you.  Bow tie or adjustable neck tie.  You pick.  I have lots of choices.


Monday, November 7, 2011

Photobucket


Home Made for the holidays is finally here. we are so excited to bring you ideas, fun and a few giveaways for this holiday season.  

 Today is day one over at My Sister's Suitcase .Holly and Nat have created a fun, cool holiday mantel and free printable this Christmas season.  Head on over and check it out. 

 Don't forget to come back tomorrow.  It's all about the boy! (And a little giveaway)

Sunday, November 6, 2011

100 Stocking Stuffer Ideas

I found this on Pinterest.  But it didn't have a link to a blog or anything. So I am not sure who made this list.  Ita pretty good.  So for those who don't have pinterest or want to link it back to somewhere. 

CHRISTMAS STOCKING IDEAS.............
1) gift cards (Starbucks, Borders, Cold Stones, etc)…
.2) A favorite candy (M&M;’s or mini candy bars)…
.3) CD of favorite music….
4) A favorite magazine…
.5) Nail Polish….
6) Paperback by an author they love….
7) Hand Lotions….
8) Tic Tacs or breath mints….
9) Nice pens….
10) Chapstick….
11) Pocket knife….
12) Socks….
13) Mini Flashlight….
14) Gloves….
15) YoYo….
16) Small photo frame w/ picture….
17) Votive Candle….
18) Personalized Key Ring….
19) Golf balls…
20) Golf Tees….
21) Mini Perfumes….
22) Travel Clock….
23) Letter Opener….
24) Fun, Colored Office Clips….
25) Cool White-Out Tape….
26) Uno/Phase 10 Card Game….
27) Colored Pencils….
28) Ruler….
29) Small Measuring Tape….
30) Rubber Band Ball….
31) Lipstick….
32) Eye Shadow….
33) Makeup Remover….
34) Nail Polish Removal….
35) Measuring Spoons….
36) Wooden Spoons….
37) Bendy Straws….
38) Tide-To-Go….
39) Batteries….
40) Fingernail File….
41) Small Makeup Bag….
42) Fishing Lures….
43) Movie Tickets….
44) Pocket Calculator….
45) Matchbox Cars….
46) TechDeck Finger Skateboard….
47) Bouncy Ball….
48) Shoe Strings (Fashion Color)….
49) Brainteaser Mini Wire Puzzle….
50) Stopwatch….
51) Pedometer….
52) Vitamins….
53) Kitchen Timer….
54) Cookie Cutters….
55) Ice Cream Scoop….
56) Nice Razor….
57) Stress Ball….
58) Magnifying Glass….
59) USB Flash Drive….
60) Cuff Links….
61) iPod Ear Buds…
.62) iTunes Gift Card….
63)Toothbrush….
64) Lifesavers….
65) Mini Kleenex Packets….
66) Handkerchief….
67) Tire Pressure Gauge….
68) Eye Glasses Cleaner and Cloth….
69) Address Pre-inked Stamp….
70) Earrings….
71) Hair Clip….
72) Comb/Brush….
73) Eyelash Curler….
74) Bobble Head….
75) Reusable Shopping Bag….
76) Shopping List Pad….
77) Travel Book….
78) Travel Electrical Adaptors….
79) Sleep Mask….
80) Mini Book Light….
81) Luggage Tags….
82) Purse Hanger (To keep off of floor)….
83) Luggage Scale….
84) Compass….
85) Portable Mini Speakers….
86) Zhu Zhu Pet….
87) Cool, Decorated Erasers….
88) Pencil Sharpeners….
89) Personalized Pencils….
90) Digital Golf Scorecard….
91) Money Clip….
92) Mini Bubble Bath….
93) Scented Soaps….
94) BBQ Tank Gauge….
95) Fingernail Clippers….
96) Back Scratcher….
97) Recipe Cards….
98) Chopsticks….
99) Mirror Compact….
100) Personalized Christmas Ornament

Here are a few more I came up with:
Letter and number magnets for the fridge
Glow sticks (my kiddos love these things)
Puzzel books (crossword, soduku)
Pudding cups
Mini boxes of cereal
Spray cheese and a sleeve of crackers
(My boys get there own can once a year)
Fuzzy socks

Hand Made Holidays is here!!!

Photobucket

Friday, November 4, 2011

Thankful Trees

I thought this year it was time to help my kids understand how fortunate we are.  Warm house, Food to eat, Clothes to wear.  I came up with these little thankful trees.

Each tree has leave that my kiddos can take off and write something they are thankful for .  On Thanksgiving I am going to have them read them so they remember what have been thankful for this month and always.

First I cut out leave in various color with my silhoutte.  I use the 8 leave pattern template and cut 2 of each leaf
.

Next I took two of the same leaves. Some the same color some different and glued them together with a ribbon as a loop. Then glue them together. To give them the apperaance of 1 leaf.


Next I found my cute little square boxes at target in the dollar section.
Bag of moss and foam block were found at the dollar store.
 In total I think I spent less than $5 for 2 trees. 


Put a foam block into the metal box. Use hot glue to top of foam and add moss.  upt enough moss that you can not see the foam. 
Last step find some tree branches andstick them in the middle of your foam block. 

Find a great spot to put them and start your Thankful Tree.


Adrienne
 I am Linking this up to:

Visit thecsiproject.com
Link Party

Visit thecsiproject.com
Related Posts Plugin for WordPress, Blogger...