Web Toolbar by Wibiya Free Time Frolics

Friday, July 1, 2011

Princess Aprons

So I saw these little cuties on a website the other day.  I thought they were totally cute and I am a sucker for princess stuff. I only have One little girl. I kind of give into anything girly.  Until I saw the price tag.  $25. Way to much for this mama to pay.  So I made my own. It only cost me about $8 and about an hour to make 2 of them.  So today you get Cinderella and Sleeping Beauty!


What you need for one:

1/2 - 3/4 yard fabric (color depends on the princess)
1/4-1/2 yard fabric for extras
Thread

 
 I cut my main fabric into sections. 13 inches for skirt, 5 inches for sash.  If I made this again I would buy and extra 5 inches to make my sash longer.


Next cut your extras. in this case the hip puffies ( not quite sure what to call them)
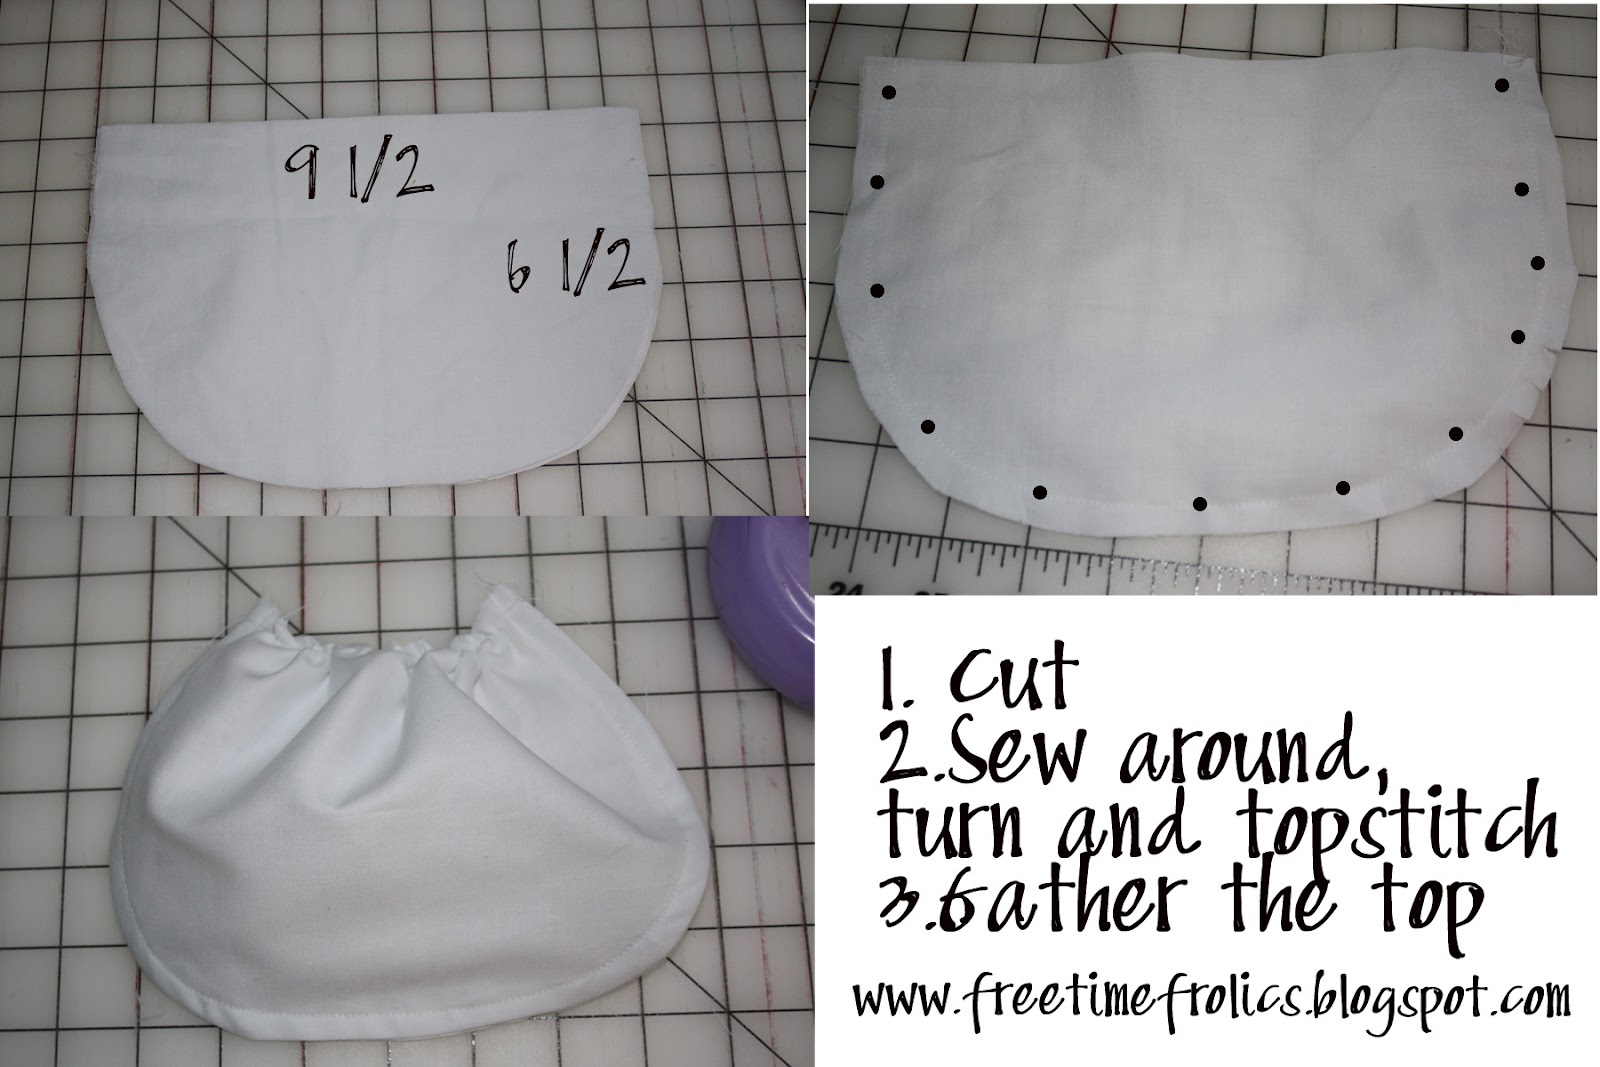
1.I started with cutting 4 rectangles 9 1/2 wide x 6 1/2 long.
Then I rounded 2 bottom edges.
Stitch around 3 sides. Clip rounded edges before turning.
Turn, Press and topstitch.
3. Gather the top.  I gathered mine to be 6 inches wide finished.

Next I folded my sash to have a finished edge.
1. Fold top left corner to right side lining up edges.
2. Fold top right corner to left edge. (You should have a triangle on the end of your sash)
3 Press.
4. Fold in half and press.
At this point I folded the straight edges of my sash  a 1/2 inch on both sides and pressed them to prepare for stitching everything together.

Okay so here I missed taking a picture.  But Its really simple.  I gave my skirt a little hem around 3 sides.  1 long (45 inches) and both short (13). About a 1/2 in.  I turned 1/2 inch and pressed then another 1/2 inch and pressed.
Across the non hemmed edge I did a basting stitch as large as I could to do my gathering. Leave you threads a little long for this.  Pull one thread and begin to gather you fabric.  When you have it the length you want tie the threads in a knot to hold it till you can stitch it. My skirts finished length after gathering was about 18 in.

I then added my puffies. Placing them each on center. Pin them into place.
Take your sash find your center and match it up with the skirt. Pin the wrong side of the skirt
to the right side of the sash.
Sew the sash puffies and skirt together.
Once done fold the sash over onto the skirt. Start at the end of the sash and stich to the other end.  As you stitch you will be finishing the sash and top stitching the sash to the skirt and puffies.

When your finished it will look like this! I added a fabric twisted rose to the center to give it a little more glam.  My little miss loves it!

I was thinking these would make a great birthday gift or party favor for a Princess and her guests!
 I think next time I may make a Belle, Tinker Bell or Alice in Wonderland apron.

Homemade t-shirts

Our new little guy is super chubby and tall.  He is so big he has almost outgrown most of his summer clothes and summer just started here in Idaho.  So I have had to improvise and get him some shirts.  In my creative quest to be a little more than boring I used my Silhouette again to make him a few shirts.


Here is my super baby.  I used heat transfer and fabric transfer to create this little shirt.  I designed the diamond and "S" in Silhouette program and cut it out. 


Little Mister Monocle
I love the mustache thing going on.  I used the mustache and monocle from Lettering Delights, Mustache Mania and Funny Faces.  I think my little guy may need a few more shirts.  What to do next????


Wednesday, June 29, 2011

4th of July Graphic Tees with my Silhouette


I saw the Silhoutte on a blog last summer.  I just had to have one.  It has sat for a while in a closet.  Pregnancy, Baby, Kids.  They suck up my time.  But I finally started to use it and I love it!!!!! I have had this project on my mind for a while and finally got it done.  I had a deadline but I got done early so I am here to share! 4th of July shirts.  My older boys picked the same one. So I only Photographed one of them. Here they are:


For the big boys


The Little Miss

And last but not least the Little Man


 I can't wait for the to wear them!  They are equally excited.


I used a template from the Silhoutte America store and the font is Oh Shoot!
If you love to craft this is definitely for you.  It cuts heat transfer, fabric, paper, magnet paper, and tattoo

paper and so much more.  I learn something new every time I use it! If you are interested watch crafty blogs for Promos.  They do them alot.


Check back for my other Silhoutte projects.

Wednesday, June 22, 2011

Pipe Cleaners and One eyed Monsters

So school is out and my kiddos are already bored.  SO at Wal-Mart I bout a $5 bag of Pipe Cleaners, pom poms, and googly eyes.  This is what came of it. 

Who knew they would be entertained for 3 hours and begging for more. 

Wednesday, June 15, 2011

Chocolate Peanut Butter Cup-cakes


Okay so I have never really been a chocolate girl. Not until my 3rd pregnancy.  I think it was the girl factor but I could not get enough chocolate.  I love to indulge in the stuff now.  I have this amazing neighbor who is a great baker.  She made a similar item one day and these babies are to die for! She lost the recipe so I have been trying to recreate it.  I finally did it.  Be prepared to enjoy!!!

Chocolate Peanut Butter CUP-cakes

1 box devil's food cake mix (I always use Duncan Hines, I think it's the best)
1 small box instant chocolate pudding mix
1 cup sour cream ( You could also use half natural plain yogurt)
1/2 cup canola oil
1/2 natural apple sauce (If you don't have sauce you can add another 1/2 c oil but applesauce makes me think they are a little healthier. It also makes them a little more dense)
4 eggs
1/2 cup milk
1 teaspoon vanilla
1 (12 oz.) package of mini chocolate chips (2 cups)
1/2 cup peanut butter or 1 cup PB chips

Preheat oven to 350. Mix together everything except chocolate chips on medium speed, scraping occasionally. Stir in chips. Pour batter into preferred pan(s). Obviously, if you want cupcakes, use lined muffin tins, or grease and flour it. I used a large cookie scoop to fill the tins (about 3 tablespoons). For baking time, add 10 minutes to the time specified on box and check. Do the toothpick test to check, you'll want a few moist crumbs. The middle won't jiggle anymore and the tops will spring back when touched lightly. If not done, check about every five minutes until done. Cool completely and frost with Peanut butter Cream Cheese Frosting.

This recipe make several dozen cupcakes.  Mine made 2 dozen large and 2 1/2 pans of mini cupcakes.

Peanut butter Cream cheese Frosting
8 oz cream cheese
1 cup Creamy Peanut Butter (add a little more to taste)
1 3/4 cups powdered sugar
1/2 teaspoon vanilla

With a whisk attachment, beat butter and peanut butter at medium speed until smooth and creamy. Add powdered sugar and beat until mostly moistened. Scrape bowl and beat at medium-low until fully combined. Add vanilla and beat at medium until fully incorporated. Increase speed to medium high and beat until light and fluffy, scraping bowl occasionally. 


These are so yummy! I really like them refrigerated. The pudding keeps them soft and moist.  I could just sit and eat the frosting by itself!  I hope you like them as much as I do!


Linking up too:

Easy Peasy Father's Day Gift

So Father's Day is coming quick and have trying to think of something quick and easy for the kids to make. My kiddos are pretty fortunate kids.  They have both sets of grandparents living and 3 full sets of great grandparents living.  So need less to say we are pretty busy around Mother's Day and Father's Day.  Lots of card making and treats to go around. So we need something Quick, Easy and Cheap when you are getting things for multiple Dads.  (I am big on recognizing all the Dad's, Grandpa's, Papa's etc...)
This is what I came up with! 


Supply List

3 rolled candies (Rolos, Mentos, Large Gi-normous Smarties) You get the picture.
1 sheet red paper
Tape or Glue
1/2 yard twine, yarn or ribbon
Small tag


Cut you red paper the same length as you candy. Leaving a 1/2 inch on end of paper for folding over.

Tape the paper to the candy along one edge and roll.  Tape rolled edge closed.

Cut twine or yarn. 3 strips of 2 inches. Glue 2 sticks together. Place twine in center and glue 3rd stick on top.  
 Wrap remaining twine around dynamite adding your tag.
Your tag can read My Dad is Dynamite! 
Or Grandpa.
Something cute from the kids and yummy for Dad!


Linking to:

Related Posts Plugin for WordPress, Blogger...