Web Toolbar by Wibiya Free Time Frolics

Tuesday, September 18, 2012

Once there was a Snowman......Kit!

Well I am back again for another day of Corn Week.  Today we are going to talk Snow.  That's right snow. You might think I'm crazy but you are going to love this easy project.  Even the kids can get involved.

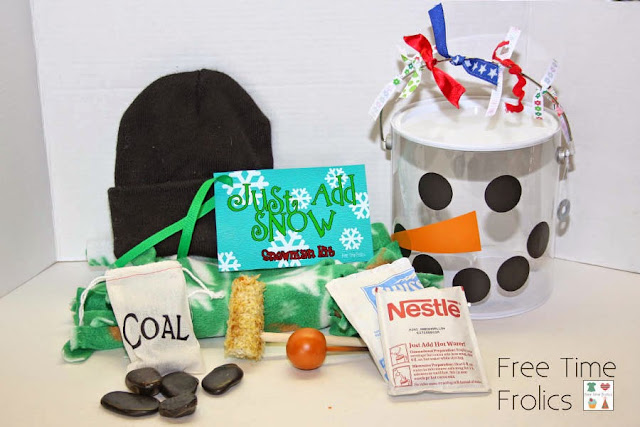
Everyone loves a snowman right??? When I was in college I had a snowman. His name was Winston. We had fun dressing him up and having him as our mascot.  As an adult I enjoy going out on a snowy day and building snowmen with my kids.  So a few years ago I came up with a fun little snowman kit. Complete with a corn cob pipe and a button nose.  I used them as my neighbor gift to my neighbors with kids. The key to my kit is to start planning now. So here is your supply list.

5x54 inch fleece or old scarf
Dowel knobs and Dowel (Size or dowel knob opening) for eyes
Large Button - You could also buy a carrot for the nose.
Rocks painted black for mouth. You could also use these for your eyes.
Hat- I like to use the 99 cent beanie hats at walmart
Corn on the cob (This is why we start now)

Corn Cob Pipe
Start with you corn on the cob.  Make sure to enjoy every bite. Thr butter, the salt every last yummy taste of summer. Once you have enjoyed your yummy delicious corn, cut your cobs into halves or thirds.

1.Trim off any access corn and leave your cobs out to dry.  It may take a few days.  You can also put them on low heat in your oven for several hours.You want them dry enough to drill holes in them. You can even dry them out and put them in a ziploc bag until you area ready to make them for Christmas.
2. When they are dry you will drill a hole in them, the same size as your dowels.
3. With a hot glue gun add a bit of glue in the drilled hole.
4.  Add your dowel and let dry.
5. Opt. You can spray your dowels with sealer.  This will help them last longer in a wet winter.

Eyes and Mouth
For the eyes and mouth have your kids gather some rocks from your yard. Wash them and  paint them black. Or buy some dowel knobs and dowels. Paint them black.  Either way your kids will love to collect rocks give them a bath and paint a shiny coat of paint on them. You can also pic up a bag of rocks from the dollar store.  They oftern have decorative rocks in black.  They are perfect for a snowman.

Nose:
For your button nose you can buy a button or a carrot.  I am using a button that I am going to glue a dowel on the back so it stays in place on my snowman.

Scarf
You can either use an old scarf or a long pieces fleece. 
Whatever you fancy.  I used fleece and cut the edges.  I had my kids sit and tie the ends into knots.  

Hat
I like to use the cheap beanies from Walmart.  But you could also make one out of foam or felt. For instructions on how to construct a hat See this post.

Add all your pieces to a fun little draw string bag or bucket.  Add the tag and you are ready to make a snowman. I added a vinyl face to my bucket or you could use iron on vinyl for a bag. No cutter needed just hand cut and apply. I love getting my vinyl here.   You can get all kinds and colors.  A lot or a little you choose.


A fun little addition would be to add hot cocoa or cider to your bucket or bag.


Right click each one and save to your computer.
Please remember to follow the rules of free printables. 
For more information please see my free printables page.


Monday, September 17, 2012

Corn Relish & Corn Cob Jelly


Welcome to Corn Week!  I have been contemplating ideas for projects. This week is all about corn.  A few of my projects are gifts, kids projects and food items. Some may be a little corny but that is what it's all about.

My first recipe is Corn Relish.  My wonderful neighbor invited me over to help in the corn harvest.  She planted 7 rows of corn this year in all different varieties. We pulled corn for 2 hours in the garden.  Do you know how to tell of your corn is ready to pick???

**** When you have your corn in hand, pull back the husks.  Pierce one kernel with your fingernail.  If the kernel pops and the corn juice resembles 1% milk it is ripe and ready to eat.  If it is more clear it needs a few more days.  If its old the juice will be starchy white.   So there is your tip for the day.  What a difference this knowledge has brought me.

Back to my corn harvest.  So we pulled the ears and shucked them.  (Save those corn husks for a later project) Keep your corn chilled.  We put ours in coolers with light layers of ice.  Once you pull the corn the juices begin into turn to starch.  Keeping them cold slows this process. Between the 4 of us we pulled and shucked between 500-600 ears of corn. We filled 5 large coolers with corn.

Corn Canning Day
The next day we all gathered together and got to work. Canning with friends it so much fun!

To start we brought our water to a boil.  We used a Camp Chef Stove and a large banquet table in the garage.  Working in the garage was great.  We were able to keep most of the heat outside and gave us a few extra burners and work space.

Step  1: Bring water to a boil
Step 2: Add corn and cook for 7 minutes
Step 3: Place corn in ice water for cooling. You want to cool it fast to stop it from cooking any longer.
Step 4: Cut corn off cob.  We did this using a serrated knife onto cookie sheets.  Save your cobs!! They will be used for the corn Jelly and a later craft project.


Now you can scoop into bags for freezing or measure for the corn relish.

Here is the recipe:


Corn and Cabbage Relish

9 C fresh corn kernels
3 C finely chopped cabbage
1 C finely chopped onion
2 C finely chopped, seeded red bell pepper (about 2 peppers)
2 stalks of celery (1/2 cup)
1 cuke, diced (1 cup)

BRINE
1.5 cups apple cider vinegar
1.5 cups distilled white vinegar
1/2 cup white sugar
1/2 cup brown sugar
1 T sea salt
½ t celery seed
½ t yellow mustard seed
1/4 tsp ground turmeric
1/2 tsp ground cumin
1 tsp black pepper, if desired*

Combine ingredients for brine in a large heavy-bottomed pan over medium high heat and bring to a boil,
stirring to make sure the sugars have dissolved and aren't sticking to the bottom of the pan.

Add all of the prepared vegetables to the brine, and bring back to a boil, stirring well to combine.
Reduce heat to a strong simmer. Continue cooking, stirring occasionally, for 15-20 minutes till veggies
are tender-crisp. Taste and add salt if needed.

Spoon corn relish into hot pint-size jars, leaving 1/2" head space. Release any trapped air bubbles by
carefully running a chopstick or other non-metallic utensil around the edges. Wipe rims clean with a
damp paper towel. Set lids atop jars and screw on bands until fingertip-tight. Water bath 20 minutes.
Rest 5 minutes in kettle and remove. Makes approximately 6 pint jars

*Add small can of diced green chilis and ¼ t chipotle chili powder for some extra zip!
Here is what we used it in: Just add your relish, tomatoes, beans of choice, avocado and dressing.
Other uses for Corn Relish:

·         Makes a great topping for brats or hamburgers
·         Use as a base for Taco Soup
·         Add sour cream (1:1 ratio), ranch dip mix, and serve as a dip with chips. (Also makes a yummy baked potato topping)
·         Great fajita or taco topping!


Next we made Corn Jelly.  Now I had some reservations about this.  It is a little weird.  Remember those cobs I told you to keep above?  Well here is one use for them.

Corn Cob Jelly

24 large ears of corn
1 gallon water
¼ c lemon juice
2 packages powdered pectin
sugar (1:1 ratio with corn liquid)

1) Place corn cobs and water in a large stock pot with the lid on. Bring to boil, remove lid, and boil hard
for 30 minutes (you want to be able to concentrate the liquid). Turn off heat and remove cobs. Strain corn
liquid through cheesecloth or a fine mesh strainer–if desired (I kind of like the flecks of corn in there as a
reminder from whence it came!).

2) Measure how much corn liquid remains (typically about a third will evaporate during the boiling
process) so that you’ll know how much sugar to add. Return liquid to the large pot. Stir in lemon juice
and pectin and bring to a boil. Add sugar to match the measure of your corn liquid all at once (1:1 ratio).
Stir to dissolve sugar and bring pot to a ROLLING boil. Boil hard one-two minutes, stirring constantly.
Remove from heat.

3) Ladle hot corn cob jelly into hot jars. Adjust lids and bands. Process in pint size jars in a boiling water
bath for 15 minutes (times may change a bit for altitude).

Makes about 5 pints.

*Lavender version: Infuse 1 Tb lavender blossoms / quart of liquid. Steep during last 10 min of boiling
(while cobs are boiling) and strain.

*Kettle Corn version: After removing corn cobs, add sea salt and cracked pepper to taste.

*Citrus version: After removing corn cobs, add an additional ¼ c of citrus juice (tangerine, orange, etc.)
and several drops of tangerine and orange essential oils.


What do make with corn??? Come back tomorrow to find out how to use those cobs for another project and the husks we saved for later this week.
apinchofjoy.com

Sunday, September 16, 2012

Reusable Pumpkin and other characters


Today's post is one I did for Eighteen 25 and there Spooktacular September.  Enjoy!


Do you ever buy those huge containers of food at Sam's Club or Costco?  Your kids eat the entire container and then you think, can use this for something or is it going to take up all the space in my garbage can.  Well today you can say I have a project for that big old container. Today I am going to show you how to reuse those empty containers into fun decor!

I started with an old cheese ball container.  You know the ones they sell at Sam's club, that your kids just love. Yeah those ones!
Let your kids eat those till they turn orange. Just think they could be Jack-o-lanterns for Halloween! Or you could use them as a treat for school or a party.
Clean out your container and remove the label from the front. If you get the label wet with hot water they will usually peel right off.  Make sure all the glue is off the container.  If not you could use a little adhesive remover (goof off)  to get it off.
Next paint your container.  I used Valspar copper colored paint for the container and green paint for the lid. Give it a good coat. Let dry.  Add one more coat.  Let dry.


While the paint is drying get your vinyl. You can buy vinyl for lots of places.  Joanns and Michaels carry a few colors.  I purchase mine at Vinyl Expressions.  The price is great and there shipping is lighting fast. Use the template here or create your own. Draw your face onto the back of your vinyl. Cut, Peel and stick.


You can add leaves or ribbon to the lid. Then use them to decorate your porch, tables or to put your Trick or Treat candy in.


Week in review

What a week!! Life has been crazy fun... I have so much to share. This weekend I was able to head to Utah and enjoy of Bloggers Night Out at Gardener Village with 100 other bloggers. Talk about fun.  These ladies were so wonderful to meet.  There were blogging celebrities everywhere.  Do you have a favorite Blogger??? Come back in a week and find out who mine is...

Here are a few items of business....

Just 2 more weeks until the Masquerade Ball starts. Are you ready?  I still have a few costumes to make. Time is going to fast.  If you want information on the Masquerade Ball click the link. I have soem great prizes to give away and one may go to you.  If you are interested guest posting please leave a comment or email me. cosettescloset {at}gmail.com.  I will get you all the info you need.

Free Time Frolics

Over the next couple of weeks I will be looking for Pattern testers to test 2 new patterns I am working on.  If you are interested in reading , making and giving feedback on one of these I would love to hear from you.

*Testers must be willing to sew project and get back to me in 10 days or less. 
* Pattern is for girls sizes 4-10
* One is for a Dress and the other a shirt and pant.
* Materials needed: Knit or cottons (outfit only)
* Tester will provide there own fabric and supplies.  
* I would love a picture of your child or grand child wearing the clothing.  
* Each pattern is expected to take 1-2 hours or less. Depending on your sewing skills.

If you are a blogger and want to try this pattern I would love to send it to you and get your feedback. Once the pattern has been reviewed, updated and ready to print I would love to send you a free copy and one to give away on your blog.  If you are interested in working with me I would love to hear from you!
Have you ever wondered how many ways you can use corn??  I have. So i decide to make a week out of it.  Be sure to come back tomorrow for Corn Week.  Projects you can make, decorate and eat all out of corn. You won't want to miss it!!


Friday, September 14, 2012

Costumes of Halloween Past–Pikachu


This is my little Pikachu.  My boys went through a Pokémon phase.  I think many boys do.  He begged for weeks for a Pikachu costume.  So I came up with this.

I used a costume pattern to give me the 1 piece outfit.  We made his zip down the back so you wouldn’t see the zipper.


Then I added Dark Brown Ric Rac across the back.  I cut a tail out of Peltex and fleece.  I sandwiched the peltex  in between the 2 pieces of fleece and stitched around the edge. I sewed  the tail onto the back of the costume. 


The hat used a basic winter hat pattern and I added the ears.  That was it.  He loved that costume.  He asked to wear it the next year.  But I think he was to tall.   He was toasty warm for trick or treating and as happy as can be.
.

Related Posts Plugin for WordPress, Blogger...