

Tuesday, October 23, 2012
Venus Fly Trap Costume, How To..
I have 3 sons. The two oldest love science. We have grown all kinds of science experiments in our kitchen window. plants, trips, sea monkeys. You name it we have probably tried it. Their favorite was the meat eating plants. We loved to catch flies and feeding them to our Venus Fly Trap. It is amazing how the slightest of touch triggers there mouths to close. Then I saw a costume for a Venus fly trap online. It inspired me to make his costume.

Sunday, October 21, 2012
Sponsors {Love}
Have you seen my amazing Sponsors? I am so grateful they are Sponsoring the Masquerade Ball. Each time someone new would contact me I just had to {squeal}!It's so exciting when companies want to sponsor you. So today I just have to share my love with each of them.

Paint me Plaid
Plaid paint is one of the first paints I used a a crafter, way back when I was a wee lass. I loved to create and make new things. It seems like tole painting was the thing to do back in the 80's and Plain paint was there. (Did I just date myself???) Yep I did. Back with no internet. When you had to buy books or take classes to figure out how to do your project. Now a days you just jump on the internet and have thousands of projects at your fingertips. Plaid Paints has just the place. There website is full of project ideas. Painting, Modge Podge, Gallery Glass, Simply Screen for painting on clothing, and so much more. Go spend a little time and find your self a project.
Fat quarter shop
Do you love yummy, soft, fresh fabrics? I do! I am a self professed fabricHoarder Collector. I love fabric. Sewing is my time to relax. That is where the fat Quarter shop comes in. They have every fabric you can think of. Beautiful bundles of yummy fabric! Anything you need you can find at the Fat quarter shop. Head over ans fall in love with there shop and Blog!
Sassy Steals

Have you heard of Sassy Steals??? They are a Daily boutique of wonder handmade and trendy items at awesome prices. They even do a giveaway each week. Be sure to stop by and enter to win something great!
Digital Party Paper Creations

I found this little shop on Etsy. So many adorable digital creations for Parties. I love her Halloween pack. If you need any Party creations for any kind of party stop by her shop. She has lots to offer with great prices!

Poppy Seed Projects is one of my new go to sites for Home decor creations. So many wonderful projects to create and personalize just for you. I have a few favorites. I think my next purchase is this Dry erase menu board. Head over and check out what Poppy Seed has to offer.
Fabric Nest is full of fun, yummy quilting fabrics. Lots to choose from. Some oldies but goodies and fresh new just off the line fabrics. This little shop doesn't disappoint. This little shop doesn't help my fabric addiction. Head over and take a peak.
I love each of my Sponsors! I am so grateful for there Sponsorship. Please stop by there shops and show them some love!!
Fat quarter shop
Do you love yummy, soft, fresh fabrics? I do! I am a self professed fabric
Sassy Steals
Have you heard of Sassy Steals??? They are a Daily boutique of wonder handmade and trendy items at awesome prices. They even do a giveaway each week. Be sure to stop by and enter to win something great!
Digital Party Paper Creations
I found this little shop on Etsy. So many adorable digital creations for Parties. I love her Halloween pack. If you need any Party creations for any kind of party stop by her shop. She has lots to offer with great prices!
Poppy Seed Projects is one of my new go to sites for Home decor creations. So many wonderful projects to create and personalize just for you. I have a few favorites. I think my next purchase is this Dry erase menu board. Head over and check out what Poppy Seed has to offer.
Fabric Nest is full of fun, yummy quilting fabrics. Lots to choose from. Some oldies but goodies and fresh new just off the line fabrics. This little shop doesn't disappoint. This little shop doesn't help my fabric addiction. Head over and take a peak.
I love each of my Sponsors! I am so grateful for there Sponsorship. Please stop by there shops and show them some love!!
Don't forget the Masquerade Ball Link party ends on Wednesday. Be sure to link up your handmade costume!!
Friday, October 19, 2012
DIY Trick Or Treat Bags
This year I wanted some thing a little different for my kids Trick or Treat bag. I thought it would be fun for the kids to see how much candy they had with out opening the bag. So I came up with these.
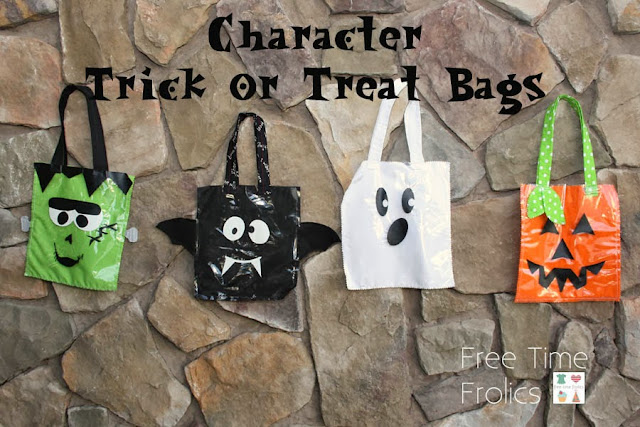
 You can make them in any Halloween shape you want. Bats, Pumpkins, Frankenstein, Monster or a Ghost. Today I am going to show you how to make a Bat.

 You can make them in any Halloween shape you want. Bats, Pumpkins, Frankenstein, Monster or a Ghost. Today I am going to show you how to make a Bat.
Thursday, October 18, 2012
Halloween Costume - Astronaut
Here is my little Astronaut. He loves Space. Ever since he was 2 he has wanted to be a real astronaut. So a few years ago I made him one.

I started by making the white jumpsuit. With McCalls pattern #4951.

For the boots covers, hat, tech bib and wrist cuffs, I purchased colored vinyl. I found most of mine at Hancocks fabrics. They had a huge assortment of vinyls. I used the pattern above to make the wrist covers and boot covers.
I kind of free handed the tech bib. I diy button covers for the colorful buttons and I purchased real NASA patches to add to the costume.
For the had I used a basic cape hood pattern and altered it a bit.
To make him a little more astronaut I made a jet pack. Unfortunately the 1 photo I took of it did not work. I am super bummed. So I will have to explain a little. Then you use your creativity to make your own. I stated with a medium rate mailing box. I punched a hole in the top and the side. I attached a curtain rod ring to the side and threaded clear tubing through it and then the ends of the tubing into the holes. I also added a string of battery powered Christmas lights to the tube. At night it looked awesome. Then I just used house hold items to make the gadgets and gizmos on the box.
I used reflective webbing to make the box a backpack and a belt. That way he could be seen ant night and look super cool.
I hope your Halloween costumes are coming together. I would love to see them. Head over to the Masquerade Ball and enter yours!!!


Tuesday, October 16, 2012
Halloween Costume -Little Bo Peep
Here is my Little Bo Peep. I dreamed of this costume from the time I knew was having a daughter. I come from a family of Boys. Lots and lots of them. So having a little girl is kind of the bees knees around here. You know the stars,moons and planets aligned kind of thing. She is my Joy and my Muse...

 |
| Little Bo Peep Costume |
I wanted so badly to make her a Little Bo Peep. Last year was the year to do it. Her little costume was a labor of love. I looked at a lot of pictures of Bo peep costumes. I came up with this.

I started with a basic peasant top. I used my Simply Jane pattern. I just made the shirt white.
For the skirt I made a basic skirt but doubled the fabric to make it more full. I added a little lace to fancy it up.
For the bloomers I used a basic capri of pajama pattern. I added 3 rows of lace to the bottoms for ruffles. (Lace and fabric from Joanns)
Her crook was an after Christmas sale candy cane I got for .25 cents. I wrapped it with white ribbon and added a large Pink bow.
Her little lamb was an after Easter sale at Target we picked up for $2.00
For her vest I used an old t shirt and cut off the arms and cut down the neck line as my pattern. Then I used black velvet and lined it with some scrap fabric.I used some turquoise fabric and cut 2 half circles. I gathered the half circles and pinned them to the vest. Sew vest with right sides together, leave a small opening and turn. Top stitch the vest. I then added small grommets for lacing.


Monday, October 15, 2012
Please Welcome {Grits & Giggles}
I'm Jenilyn, author of Grits & Giggles. I love to share my adventures in sewing, crafting, and being a mommy! I'm so excited to be at FreeTime Frolics today to share with you how to put together a TuTu Dress fit for a princess!
My daughter's favorite song is "You Are My Sunshine". She sings it all day and it never gets old to hear! She loves to dress up and twirl, so I knew for Halloween she needed a sparkly tulle dress. I wanted it to be golden and beautiful, just like the sunshine in her favorite song.

Let's get started!
Materials:
1" Elastic
Tulle- 100 yards for a 2T size
Flower Clip
Coordinating Ribbon

Measure around your little girl's chest. This is your elastic length. Overlap by 1" and sew the ends together. You want it fitted, but not too tight.

Measure her height from her chest to where you want the tutu to fall. Multiply this by 2 and add 3". This will be your tulle length.
ex: my measurement was 20"....so my tulle length was 20x2+3= 43"
Cut strips of tulle this length and the width of your spool. You will need a LOT, especially if you use a light color.

I place the elastic band around my leg for support. Place 2-3 strips of your tulle, in different colors, together and fold in the middle. Slip this under your elastic band.
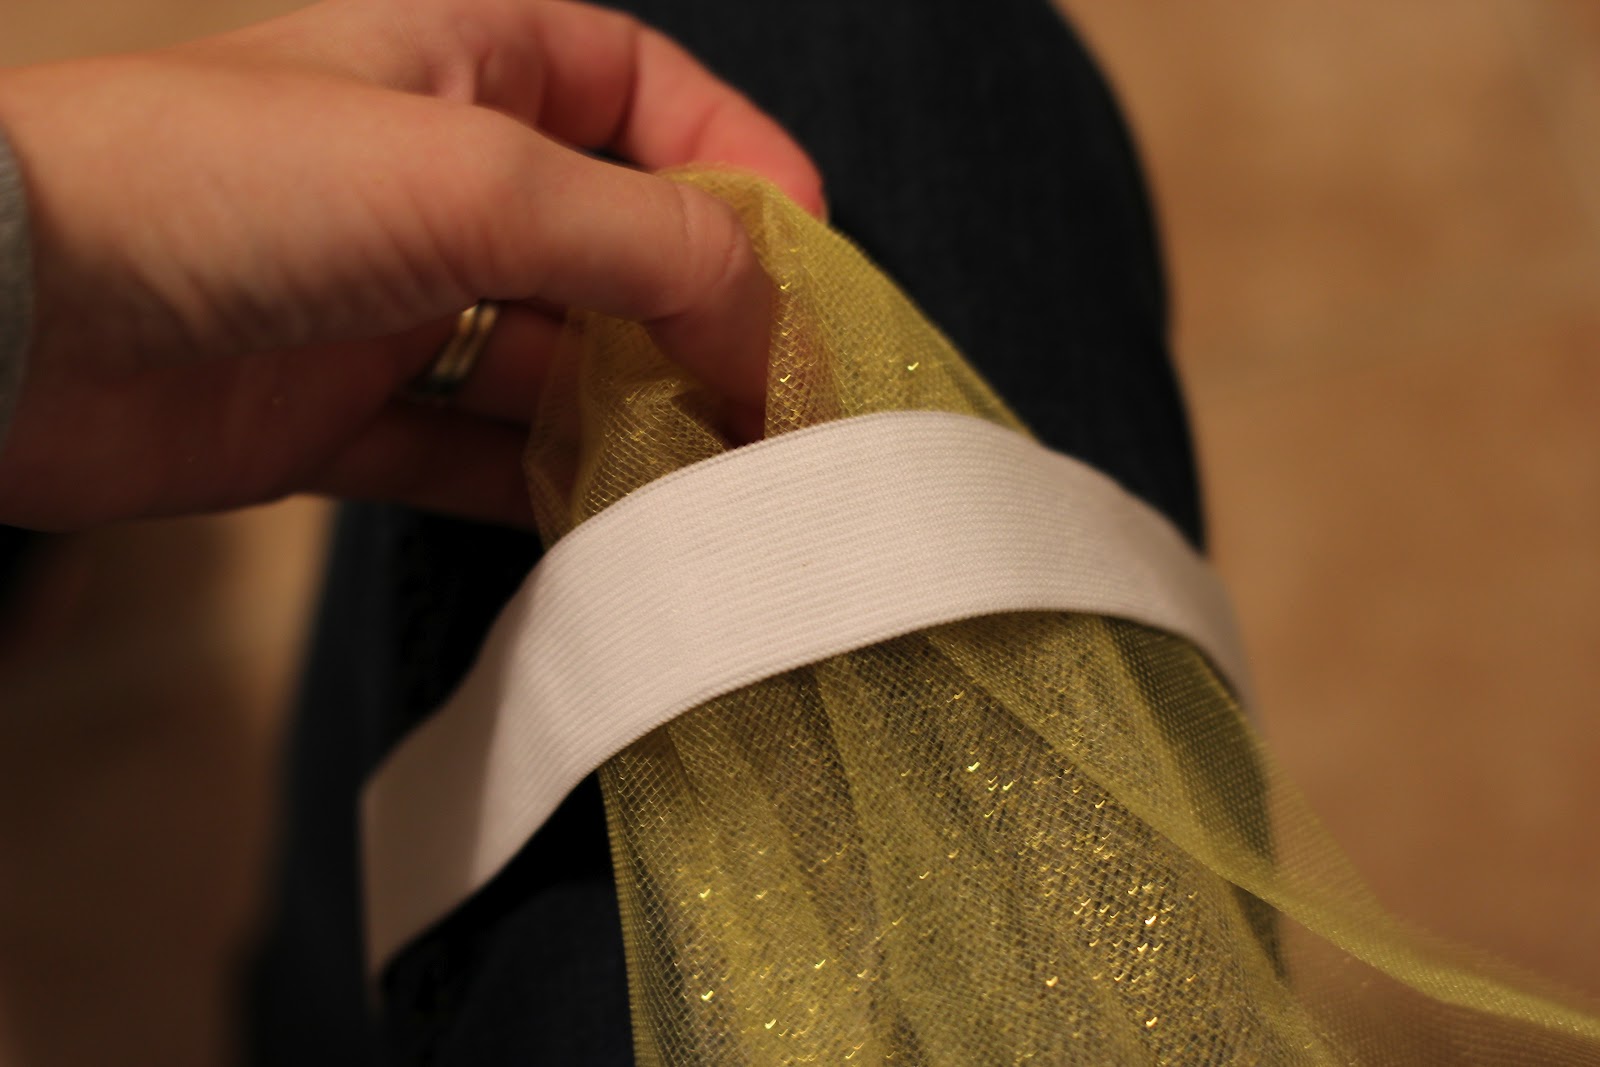
Then pull the ends of the tulle through, creating a knot. Don't pull it too tight yet, as the elastic will stretch when you do. Wait until you're finished to tighten.

Continue tying these knots all the way around the elastic, alternating colors and combinations. Gently tighten your knots when you're done.

To add a halter strap, cut a long length of your ribbon, and tie a similar knot, between two knots of tulle.

Clip on your flower clip and you're done! Your tutu dress is ready to be worn and twirled in!

It flows beautifully, and sparkles in the October sun.


Thanks again for having me from Grits & Giggles!
Check out some of my other Halloween and Fall Tutorials!
Thanks Jenilyn. I love these tutu dresses. They really pack a punch. If you haven't been over to Grits and Giggles. She has lots of great tutorials. Head on over and take a look!
This post is Sponsored by:
Subscribe to:
Posts (Atom)