Web Toolbar by Wibiya Free Time Frolics

Monday, December 3, 2012

8 Maids of Milking

Thanks Holly and Nat for inviting me! I love this song!  I think this is one of the first songs I fell in love with as a kid at Christmas time. This was a bit of a challenge but here is what I came up with.

12 Days of Christmas_300


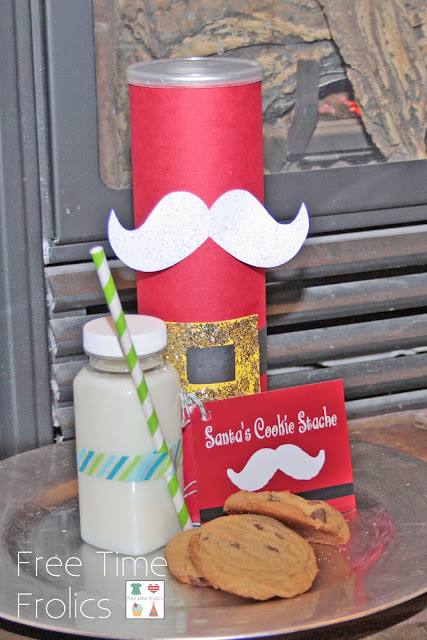
I thought it would be fun to have a quick and easy to go treat for Santa.  You know to go with his milk!

Here is what I did!!

Supplies:
Pringles can
card stock: Red & White
Gold and white glitter
Cookies or Cookie dough
Jug of Milk

Cover your Pringles can in red paper and tape or glue ends.

 I printed mine off on my printer.  After cutting your buckle and mustache, turn over to the white side of the paper, put a small amount of modge podge on both of them and sprinkle they with glitter.   Let it dry.


When dry use glue dots or glue to secure your belt, buckle and Mustache into place.

Add your tag and your all done!


Add a jug of milk and some cookies and you are ready to go. Santa will a have a little snack on the go!!

Want to make it a neighbor gift???  Instead of cookies, fill the the container with cookie dough and print off the poem.


To see the other 12 Days in the series click on the links below!


SNAP!52 MantelsMiss InformationSixSistersStuff.com

Friday, November 30, 2012

Washi Tape Ornaments


I love Washi Tape!!  I love to make projects with Washi Tape.  It is inexpensive and really packs a punch!  this season I decided to make a Washi tape Ornaments.

What you need:
Washi Tape (Michaels has great new festive tapes this season.  Just ab out any Christmas color you can think of, even gold and silver)
Foam core ( I get mine at the dollar store)
Exact-o Knife
Modge Podge
Frame
Ribbon
Opt: Vinyl saying

I first took an old frame I had and covered the glass with white paper. Missed this picture but you can just imagine it.

Next I found some ornament shapes on the Internet and printed them.  I flipped them wrong side up and covered the paper with washi tape.  Then cut them out.

Take some modge podge and glue the ornaments to a piece of foam core.  I got mine at the dollar store. Let the glue dry. Putting them on the foam core makes the jump off the page.  Not so flat.

Once the glue is dry use an Exact-o knife and cut around the edge of the ornaments. To give my ornaments a little sparkle and texture I used glitter glue pens to dot the polka dots, and lines on the washi tape. It is hard to see in the pictures but in person they look great.

Once your ornaments are cut out, place them on your frame.  I played a little with the placement until I liked it.


Add some ribbons for strings and bows with glue dots.


Once I got this far I thought I would be happy but I decided to add the Phrase Merry & Bright to my frame.  I think it finished it off perfect!!! I just love how it turned out.

Wednesday, November 28, 2012

Buddy The Elf!!

I find as I get older, the idea of Christmas is Nostalgic to me.  I yearn for a Vintage Christmas.  Lots of Snow, Real Christmas Trees, handmade Ornaments. You know the kind we had when we were kids.  I loved watching Christmas movie, seeing Santa and driving around to see Christmas lights.  So this year I am trying to make a less commercial and more down home Christmas.  I love sharing old movies and music with my kids.  One of my favorite movies is Buddy the Elf.  I realize its not super old but its older than my kids.  So to them its Vintage. Buddy  makes me Smile!

Today I am sharing my favorite quote from the movie!  Enjoy! Just Right Click on the image you want and save to your computer.


 PLEASE follow the following rules for Free Time Frolics printables:
  • I would love for you to become a follower of Free Time Frolics via Rss or Facebook. More Free Printables are coming. You don't want to miss out.
  • Free Time Frolics printables are for PERSONAL USE only. You may not re-sell, re-distribute, or claim them as your own.
  • If posting on the internet, you MUST post a link back to the original post or this page.
  •  Freebie printables are offered "as is" unless otherwise noted. 
  • Pin, share, use in your home or as a gift.  Enjoy!


Monday, November 26, 2012

Fingerless Gloves DIY


I love finger less gloves.  I think they are cute and stylish.  I was perusing my local thrift store when I found some old sweaters that would be perfect for my project.  I found this sweater vest for $3.


Friday, November 23, 2012

Rainbow Snow


I was thinking a few weeks ago with our first snow, it would be fun to have colored snow.  So Little Miss and I headed out to the store for spray bottles.  We came home and mixed each one with a few drops of food coloring and we were ready to go.

So Little Miss and I went out and made ourselves a Rainbow.


My kids had a blast with the colors.  They can't wait for it to snow again! Next time we will make a Snowman with my snowman kit.

Pin It

Wednesday, November 21, 2012

Bloggers Night {Swagger}

For Bloggers night this month we were able to meet Chantel, the owner of Swagger.  Swagger is a local clothing boutique that also has an online store.  We had a blast trying on clothes, our own personal fashion show. She has lots of adorable clothes and jewelry to choose from. I love the  unique style she sells and knowing that not everyone will be wearing  the same thing.

Our Idaho Bloggers Guild nights prove to be fun and relaxing nights.  I love these gals and look forward to my evenings with them.  Thanks Ladies and Thank you Swagger for letting us shop the night away!

Meet the ladies of the Idaho Bloggers Guild!

Makenzie -Girl Loves Glam
Megan- Crafter Club

Pin It
Related Posts Plugin for WordPress, Blogger...